


.jpg)


.JPG)

I produced a deployment for the Romans, which basically divided the cavalry equally between the two wings; shifted the Velites to the wings; and took the Roman Triarii from the centre onto the wings. Overall, it was kind of similar to Scipio's deployment at Ilipa, without the Spanish of course. The reasoning was that I was expecting the Carthaginians to put their elephants on the wings, and I wanted to try to counter them without weakening the Roman centre too much.
William and Gordon drew up a deployment for Carthage. They put all of their heavy cavalry on their right, with some elephants in support; divided their Numidians equally between the two flanks; and weighted their left with most of the elephants. Their centre was one gigantic phalanx in depth, with their best troops to their left and a couple of Gallic warbands at the front left. Massing the various spearmen in depth in the centre gave them a counter to Roman heavy infantry strength, but if a couple of units routed they could disorder the rest on morale. Like Hannibal's historical choices, it was a tough decision, set on a knife edge.
.jpg)
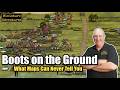
The first photo shows the game underway, with the Roman right in the foreground (note the elephants here). The players are Billy on the left and Gordon facing him. You can clearly see the mass of the Carthaginian centre and the legions facing them in shallower lines.
.jpg)
Picture number two shows the same point in the battle, from behind the Roman centre. The Romans are already shifting some more Triarii to their right in case the large numbers of elephants there break through.
.jpg)
The third photo is taken from the Roman left rear. The troops with the plain red and blue shields at the near end of the Carthaginian infantry line are my Essex imitation legionaries, standing in for Bruttians with looted Roman armour.
.jpg)
A close-up on some of William's recently painted elephants.
.jpg)
Things are starting to go wrong for Rome as the weight of the Carthaginian centre makes itself felt. This shot is taken from the Carthaginian left; you can see their cavalry numbers beginning to tell here too. Thanks to Michael for the pictures.
The elephants did nothing much, but the threat helped to spread the Romans just thinly enough that damage right across the front defeated them. Carthage lost 11 out of 14 breakpoint units, only three of which were infantry. However, another four of the big blocks of foot were near breaking point. A good victory for Carthage, then, but a Pyrrhic one. Which is interesting, because it almost played like a battle between Rome and Pyrrhus.
More photos will follow if and when people send them. I find it almost impossible to run a large game like this and take pictures at the same time!
This looks incredible. Is the second photo from the Carthaginian left or right?
ReplyDeleteHi Steven, thanks for looking. I think the one you asked about is taken from behind the Roman centre - shows what they were up against!
ReplyDeleteI don't know about you, Paul, but playing in that game as well as trying to get about the show and buy stuff left me exhausted! I felt like I'd actually been fighting at Zama, not pushing miniatures around!
ReplyDeleteHi Ian, I know exactly what you mean. I'm glad I arranged a pre-order with 1st Corps. The only other stuff I bought was some grass tufts for basing from Mutineer Miniatures. I didn't have the energy for any more than that!
ReplyDelete