Wednesday 23 July 2014

And now for something completely different

...tanks, to be precise. I loved these when I was a lad, but I don't like making them - too fiddly.  However, Thomas has expressed a bit of an interest, so we will be taking the plunge.  Several questions will need to be answered, the most immediate being which scale, and which rules?
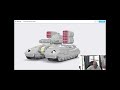
Bill set up a scenario at the club yesterday evening, by chucking together as much of his stuff as he could.  The idea is that, somewhere in Sicily in 1943, a Tiger tank undergoing trials has broken down in some cruddy village, as they do. The infantry with it stop off for some ersatz coffee while the engineers start work on it. However, the allies have landed and news is brought of an impending enemy advance by some cruddy Italian tanks, M13-40s no less, as you can see in the first photo. The race is on - will the Brits get here and capture the Tiger?  Will the engineers fix the damn thing?  Will the little motorbike manage to rustle up some reinforcements?  I play the Italians and the Tiger, while Keith, Darrell and Billy lurk off to the right of the shot above with Panzer IIIs and IVs.  Alan, Alan and Hayden play the attackers, coming from off to the left of the first shot.  Everything is supplied by Bill, in the form of various 15mm models and supporting troops.
A commander's viewpoint: what my M13-40 command tank can see.
There are two platoons of German infantry in the village.  One is to the left of my position, one to my right.  Coincidentally, this is the direction from which the German armour will come, so I leave the guys at my left to their own devices as my motorbike roars off to activate the platoon to my right.  I reckon the other guys will wake up when the Brits arrive anyway.
My five M13-140s scatter into various positions.  I also have three Semoventes to the right of the photo above, which I send off towards the right flank of my position, ie the top of the photo as you look at it.  The engineers are still having trouble starting that Tiger's engine.  Stupid fuel sumps...
My despatch rider arrives at the villa and has great fun kicking supposedly elite German infantry to their feet, before roaring off to the right in search of their reputed armour support.
The view from my semi-armoured crud: a British formation led by three Shermans.  I am well outgunned, not to mention the fact that they have a longer range too.
The Semoventes make it to their position at my right.
Those Brits are good - must be veterans from the desert rats.  Three shots, two kills.  My commander is going to have to scurry for cover.  The attackers have had to slow down to shoot me up, giving the engineers time to get the tank started.  It starts backing off, slowly, off to the right of the photo.  Tigers are always slow.
At the left of this photo, you can see that my commander has made it around the wall and out of sight of those Shermans.  This has moved him out of command radius of his other two tanks, who sit tight until they are told what to do.  Fortunately, though, the Tiger has managed to move back a bit, before one of the sumps almost caves in again.  I have to give it some time to rest.  At the top of the photo you can see British infantry arriving in force.  They are content to screen the Germans in the villa nearest them, lobbing mortar shots to make them keep their heads down.  More enemy armour is at the top right, moving towards my Semoventes.
The Germans roused by my heroic motorbike move out of their own villa to the field beside the Tiger.  The motorcyclist has by now found the German armour, and it can be heard off to the right, roaring forwards to engage the Brits.
The guys in the forward villa hold on.
The view of the left of the field from my rapidly retreating command tank - lots of British armour.  Fortunately, the Tiger has started moving again, but even so this is going to be tight.
The Brits turn up the heat on the villa.
The Panzer IIIs have arrived on my right, only to be met with devastating fire from those Shermans.  Oh well, at least they'll buy some more time for their big brother in the centre.
This, however, is not good. My commander has not quite re-established control over his other two tanks, and the Shermans have arrived.
It turns out that the only decent gunner in the Italian army happens to be in this tank, scoring a suppressive hit that stops the Sherman briefly.  Basically, I needed a six, and that's what I rolled.
The remnants of my squadron can now retire, escorting the Tiger further to the rear.
The Panzer IVs have arrived at my left, only to meet the same fate as the Panzer IIIs.  These Brits are good!
A final gratuitous shot of the guys doing all the damage.

The Tiger almost broke down again, but we called time with it still intact, despite the loss of seven tanks for pretty much nowt done to the Brits.  It was enjoyable, and I liked the rules (Spearhead). Thomas wants to play a low-level game, where a tank is one tank, so I have been thinking of ways to adapt the rules.  The ranges are relatively low when compared with the size of 1/72nd models, but I can easily scale up the weapons.  I think I know how I'm going to do this...


Tuesday 22 July 2014

Welcoming the Faux Gamer

...whose blog is here. I like its title: nerdusinterruptus!

Sunday 20 July 2014

Joe Derocher Shared this

Joe shared this via Google +:

http://peterw3169.blogspot.co.uk/

There is a truly lovely Thracian command stand on there just now.  Do go and have a look!

Wednesday 16 July 2014

Viriathus in Lusitania

The Romans have finally subdued large parts of Iberia in their brutal campaign against the Celtiberians and Lusitani.  The last of the freedom fighters have been pressed back against their final oppidum, and the Romans close in for the kill. I constructed the army lists for both sides and supplied the figures.  Terrain was pretty nasty, since this is the interior of Hispania, as the Romans have called it. We ended up with something like four-five commanders on each side.
The first photo shows the Roman right wing: Numidian auxiliary light horse and all of the heavy Equites in the army (Malcolm in command of the Numidians, Bill leading the Equites).
The centre of the invading army: lots of legionaries with Velites and Numidian auxiliary skirmishers out front.  Billy commanded the legions - consul of the day.
The same forces from another angle.  Lots of rough stuff to slow down the legions.
Their left wing is covered by large numbers of Spanish auxiliary infantry. Simon ran these guys, with plenty of help from Hayden.
The right wing of the defending army: some light infantry and a couple of loose formation Celtiberian Warbands with lots of nice trees for hiding.  Graham in command.
The Spanish centre right: large close formation warbands and medium horse (Alan).
Two more large warbands at the Spanish centre left (Darrell) and some light infantry in the town and light horse at our far left (me).
A long table shot taken from off to my flank.  At the far end you can see lots of trees.  There is some rough right in the middle of the field.  In front of the Roman cavalry is a long steep ridge, and in the right foreground of the photo is the oppidum and its water supply. Both sides have brought plenty of skirmishers and the Romans have left the Triarii out of the army.  Because this is Iberia, they have instead engaged large numbers of mercenary Numidians and Spanish auxiliaries. We see this period (140s BC) as transitional, somewhere between the full three-line legion of thePunic Wars and the cohort-based troops associated with Marius.  Basically, a legion comprises 24 Hastati, 24 Principes and some Velites.  There is no discernible difference between the Hastati and Principes. They can form up in duplex acies, or side by side, which is what Simon has done in this case.  The Iberian defenders of freedom are at a points disadvantage, but we are hoping that the terrain plus missile power will maybe create an opportunity.
The battle begins.  The entire Roman infantry line moves forward at the pace of the slowest unit so that they can keep to their pretty checkerboard formation.
A low angled shot of the entire field, with my light horse in the immediate foreground.  Lots of missiles and bad language are exchanged as skirmishers begin to disappear from both armies.
We are expecting the Equites to stay behind the ridge, but instead they climb up onto it so that they can cover the rightmost end of the heavy infantry line.  This is the only real possibility we have of local superiority, so Darrell moves his warbands forward a bit.
A low shot of the whole field at this point.  In the far distance, Graham's wing is being wiped out in the woods.  He hasn't been having much fun.  Simon, on the other hand, is enjoying it because he's the one doing the wiping.
Another low shot, taken slightly later.  In the immediate foreground, my lurking slingers are getting the upper hand in the missile exchange.
A close-up of the last stand of Graham's Celtiberians at the far end of the field, swarmed by traitors fighting for the evil red empire.
Simon's auxiliaries have broken through entirely.
Back on my flank, my light cavalry and slingers are winning, but there isn't really anywhere for them to go - it's all going to be decided elsewhere.
The whole field at this point.  Our right is gone and the Romans have dressed their lines in preparation for that which Romans do best.
A close-up of the first contact just to my right.  Hayden's warbands gang up on some Latin legionaries, while Bill commits his Equites.  They are taking quite a bit of grief from my slingers, and need to stop me getting onto the right flank of the heavy infantry.  Unfortunately for us, though, the Latins hold.
The Roman centre closes in for the kill.
And the final photo shows more of the same.

Once the legions arrived, it was all over pretty quickly.  Darrell did manage to destroy those Latins, but the cavalry's morale held and I couldn't hit a thing in melee.  Most of the peninsula is now coloured red.

I have rolled for subsequent campaign events:

  • The Ptolemaic Egyptians advance into Elymais once again.  The elusive Parthians inflict some hit and run attrition.
  • In Autumn 143, the Romans consolidate in Lusitania, and pay for Viriathus to be murdered. The remnants of the Acahaean League forces retire to Corinth, awaiting the inevitable. The Egyptians conquer Elymais.
  • In Spring 142 Athens capitulates to the Romans, while the victorious army in Iberia moves back to Saguntum for a break. The Egyptians press forward into Persis, taking more attritional damage as the Parthians continue to retire in front of them.
  • Summer 142 sees the Romans investing Corinth and the Egyptians conquering Persis.
  • In Autumn 142 the Romans destroy Corinth and send their Iberian forces to the Baleares.  The Ptolemaics enter Carmania, again taking damage from hit and run horse archers.  The Parthians ride back to their capital to pick up reinforcements.
  • In Spring 141 the Romans formally annexe the Balearic islands and gleefully accept Sparta's submission. Carmania is subjugated by the Egyptians
  • In Summer 141 the Egyptians move into Tabiana, where they are finally attacked by the Parthian host. 


Monday 14 July 2014

Caesar's veterans

The first of Caesar's Romans proper:
The mounted legate is by Navigator, and almost all the others are by Companion Miniatures.
A full frontal shot, if you know what I mean...
...and how they look to the opposing player.  I have another legion to do like this with cloaks to denote campaign veterans.  I'll maybe do the next legion slightly differently, with darker shades of red for the men's cloaks, while command staff will stay with scarlet.

The total so far for 2014 is 376 foot, 106 mounted and seven elephants painted.  I was intending to start the next legion, but my order of LBMS transfers went awry.  While I wait for those to arrive, I'll paint a dozen Aventine cataphracts for Willie.  I'm looking forward to these.

Saturday 12 July 2014

The Parthians are coming!

The latest great power to join the campaign makes its mark.  The Ptolemaic Egyptians in Elymais are confronted by an angry host.  I constructed the armies and supplied most of the figures.  I also set up the Parthians, but then took a back seat as there were six other folks wanting to play, making three per side.
The right wing of the invading Egyptian army: a lot of light cavalry and some camels, with skirmish infantry. Commanded by Graham.
Gordon set up the Egyptian army and commanded their centre: a lot of mediocre Machimoi phalangites, somewhat stiffened with a couple of smaller heavy pike units.  Skirmishers out front.  Note the two cavalry units held in reserve.
Their left (Simon) rests on some rough stuff.  The rest of the Machimoi are positioned here, with peltasts, more reserve cavalry, and skirmish infantry.  Gordon has set up the army pretty much how I would have done it: a wall of pikes with skirmish cover, and light infantry, camels and cavalry being used to try to watch the flanks.
The photo of the Parthian left (Billy in command) was too blurry, but basically it comprised a wave of  horse archers in front of some of the cataphracts.  Above is the centre (Willie), composed of a few large blocks of mediocre Greek settler militia, preceded by more horse archers.
The Parthian right (Hughie): more horse archers and cataphracts.
A long table shot taken from the Parthian extreme right.  The Parthians are at the left of the photo, Egyptians on the right.  I hope this picturer shows the relative deployments well. At the far top left a load of Parthian horse archers in front of some rough threatens to overlap the Egyptian right. At the near left, Hughie looks as though he will be able to do the same, with close support from his cataphracts.  On the right, you can make out the reserve positions assigned to the Egyptian cavalry. Since I wasn't playing, I was able to document the battle with quite a few shots taken from this side.
The one above shows the initial stages. At the far top end Graham's cavalry are bowing back away from Billy's encroaching horse archers. In the centre the Egyptian pikemen press forward relentlessly, not too bothered about Billy's cataphracts here.  In the immediate foreground, Hughie's mounted masses threaten to stretch the Egyptian left. I bought plenty of skirmish infantry to protect the front of the Egyptian pikemen, but the massed archery from the Parthian centre and right made short work of them, and the Machimoi are already beginning to suffer.
The photo above shows the same perspective, a couple of turns later. At the far end, Billy is being pressed back, while the pikemen continue their advance in the centre. In the foreground, the flank of the Machimoi is temptingly open. Simon tries a combination of his peltasts and a large ubnit of medium horse to cover it. Hughie has meantime sent forward some light horse, while keeping his cataphracts somewhat further back.
A close-up of the centre at this point as the advancing Egyptian skirmishers have vanished in a hail of arrows. At the left, Willie's Greeks foot await the Machimoi while the horse archers continue to do what horse archers do best.
At the far end of the field, Graham continues to try to protect Gordon's right as his pikemen start to contact cataphracts.  In the centre, we are about to find out if those Greek settlers will hold.  And in the foreground, Hughie's cataphracts have angled inwards, threatening the left of the Machimoi.
Fighting is now general across most of the field. On this flank, Hughie has committed two of his three cataphract units to attack the peltasts and medium cavalry, while swinging his third right into position on the open left of the Machimoi, supported by more horse archers.
The Greek settlers hold the Machimoi in place: a close-up of Hugie's impending charge.
In they go, merrily crushing the left of the Egyptian infantry line.  Being hit in the flank by cataphracts is not nice.
The final photo shows Hughie's horse archers swarming a weakened unit of Machimoi.

Hughie's attack wins the game for the Parthians.  At the far end, Billy's command was really mangled, losing all of its cataphracts piecemeal to Gordon's advancing pikemen, but taking most of Graham's troops with them. The Egyptians are rudely dumped out of Elymais, and the Parthians have made an impact on history, albeit at a cost.

I have continued with campaign events up to the point where we see another battle.  The main events are:

  • The Romans keep pressing the Celtiberians without being able to bring them to battle
  • The Egyptians consolidate in Syria, as the retreating force from Elymais falls back even further to link up with the army that has been annexing bits of Asia Minor
  • The victorious Parthians reconquer Elymais
  • The Egyptians move back east, arriving in Babylon with their large combined army
  • Meanwhile, in Greece the Aetolians throw in their lot with Rome, no doubt influenced by the brutal efficiency with which the western barbarians disposed of the Acahean League's army a few months previously
  • After the winter, 143 BC begins with a bang as the Romans finally corner the last remnants of Iberian resistance in Lusitania.
And that will be the one we fight next.