Monday 29 April 2013

Hi Millsy

Just thought I'd say hello, and thanks for joining.  Do let us know if you have a blog of your own too.

Quick edit: Millsy's blog can be found here.  He has some especially lovely Lovecraft-style stuff - I like the Servants of Lo-Meh, Laziest of the Elder Gods.  Sounds like some of my students...maybe the magic is that they somehow manage to pass regardless.

Saturday 27 April 2013

Thracian revolt crushed

On Tuesday, we played the latest in our Empire campaign: the Macedonians attacking Thrace.  It was one of the most gloriously satisfying massacres I have ever been handed - I lost in spectacular and hilarious fashion. Everything that could go wrong did do go wrong - commander killed, centre crushed and lots of Thracians wiped out.  There is something therapeutic about such a cleansing experience, especially when it's a relative sideshow in campaign terms. The outcome didn't bother any of us very much, but it was just great fun to play.  No photos, because time was tight and I didn't dig out the camera in advance.  Next up is scary: the Romans have finished with Carthage and have now landed in Greece, which has also rebelled from Macedonian control.  The Romans with Greek allies are about to meet a Macedonian field army, so the Macedonian Wars are about to begin in earnest...

Sunday 14 April 2013

Lutzen

Yesterday Willy hosted another large 15mm Napoleonic game on the sand table in his unfeasibly large shed. We had twenty players, including visitors from Northern Ireland and England.  This was a difficult scenario to construct.  It begins as an encounter between Blucher's Prussians and some of Ney's corps, and then turns into a bit of a free for all as various other formations arrive from all sorts of directions - a huge muddle, in other words.
The first photograph shows the start of the battle.  The Prussians are on the left, climbing the hill towards a town called Gross-Gorschen behind which the advance elements of Ney's Corps can be seen (on the right as you look at it).  At this point the Prussians are more numerous - at the top left is a cavalry brigade, with three infantry brigades converging on the town itself , bearing in mind that a Prussian 'brigade' is the same size as everyone else's divisions.  Of to the right of the photo the rest of Ney's troops are marching forward as fast as they can, as are two more French Corps at the far end of the table beyond the Prussian cavalry.
The second photo is more of a close up of the immediate action.  Note that the Prussian cavalry have swept well beyond the town - I had thought they would simply hang back to watch the Prussian left as the assault goes in.
Photo number three shows some local Prussian cavalry success - a regiment of Dragoons has just ridden down two French infantry battalions in quick succession (they both advanced a bit too far and failed to form hasty square - not a good position to be in...).  I felt the brave Prussians deserved their own photo.  Gross-Gorschen is off to the top of this picture.
I was busy as depute umpire, but I took the long table shot above as the struggle for the centre intensified.  You can probably make out indistinct masses of French coming down the table lengthwise in the background of this shot (commanded by Bertrand and Marmont).  The foreground shows yet another French infantry Corps, under Macdonald.  Facing them, the cream of the Russian Cuirassiers and Grenadiers have also shown up on table.  By this point in the game there are a lot of bodies in and around Gross-Gorschen in the middle of the field, both alive and dead.
Above is another long table shot, taken slightly later than the previous one.  Latour-Maubourg's Cavalry Corps can be seen at the bottom right of the shot.  Just arriving now at the left are the Russian Guards.
We represented the disjointed nature of the Allies' arrival by allowing the various formation commanders to decide for themselves what to with their forces as they arrived.  Nominally, I was Wittgenstein, the ineffectual Russian C-in-C; I would be allowed to send aides to try to get them to do what I wanted, but the initial orders would be up to them.  The photo above is a case in point; instead of the Cuirassiers and the Guard Cavalry both heading off in the direction of Latour-Maubourg's horse, the Russian Guards charged into the midst of the enemy infantry to their front, destroying two foot batteries and so depriving the French here of any decent artillery support.
We cleared all clutter from the table to take a series of photos depicting the crisis point of the battle.  Ney's initial two infantry divisions have been destroyed, as have two of Blucher's large brigades.  The photo above shows Bertrand's corps in the foreground advancing on the Prussian left, with Marmont's troops beyond them (taken from the Prussian baseline).  Napoleon's right pincer is closing...
Slightly further into the centre, the left foreground shows a detached Russian Light Cavalry Corps; they got lost en route to the field and ended up at this end of the battle instead of next to the rest of the Russians, who are well off to the right of this picture.  Cresting the ridge line right in the middle of the photo are the French Imperial Guard.
Above is the massive conflict around Gross-Gorschen.  At the bottom right you can just see the advance troops of Yorck's Corps.  Almost everyone seems to be heading towards that town!
Off to the right of the Prussians, however, the Russians seem intent on starting another battle of their own.  The Grenadiers have taken the village here and are already giving the French in front of them a hard time.  Just to their right, the Guard Cavalry has reformed ready for another go, and behind them the Guard Infantry is streaming on.  Masses of French infantry and cavalry await them at the top right of the shot.  At the very bottom right you can just make out the Russian reserve artillery arriving as well.
Above is the final photo of this moment from the Allies' perspective: Russian Cuirassiers are in place to try their luck against Latour-Maubourg's Cuirassiers, and a second wave of Russian Guard Light Horse have just appeared at the bottom right of the picture.  This is shaping up into an epic cavalry confrontation.
A full table shot from the flank.
Now we continue to work around the battlefield, starting from behind the French left, at the same time as the photos above.  The shot of the cavalry confrontation was a bit rubbish, so I deleted it, but here you can clearly see those nasty Russian Grenadiers in their town, and their friends in the Guard behind them.  This is not an encouraging sight from the French perspective!  The gap to the left of the picture is where the guns used to be.
Above is the struggle for Gross-Gorschen as it looks to the French.
Finally, the more open terrain to the French right, with the two Infantry Corps closing in towards the Prussian centre.
Back to the French left/Allied right as the Cuirassiers clash.  All eyes turned towards this flank for a change!
The dust clears, and the French have got slightly the better of it.  At this point I had to leave, but not before I managed to lose the Guard Light Cavalry that was supposed to support the Cuirassiers.

Everyone seemed to have a good time.  These big multi-player games make good social occasions.  The rules were adapted Shako II, using 25mm distances with 15mm figures to speed things along a bit.  Historically, many of the formations took a long time to get into action, and that wouldn't be fair on the folks who travelled to Glasgow.  The order of the events remained the same, though, and by the time of the final photos everyone was involved.  I might see if I can post photos by other folks at one point - a big thank you to everyone who made it!

Friday 12 April 2013

Welcome to Anne O'Leary

...who also frequents The Miniatures Page.  Thanks for joining, Anne!

Edit: see here for Anne's blog.  I have to say that my mention is nothing to do with Fran's warning in the comments section below...

Be afraid of what, I wonder?  Hmmm, gamers and painters with a sense of humour - surely not!

Saturday 6 April 2013

Battle of Chalons: Club 1st Tuesday Game

It was the turn of our group of ancients players to host the traditional multi-player game on the first meeting of the month, so we tried out the scenario for Chalons.  This is a scaled down version of my original; thanks are due to Simon MacDowall for graciously allowing me to adapt his scenario.  Map of the field:
The Hun army is in red at the top of the map.  It is composed of a confederation of Huns, Heruls, Gepids and Visigoths.  Commands are as follows:

Right Wing: a column of 18 Gepid and Herul heavy lancers; 18 Gepid light foot bowmen; a large warband of 48 Gepid foot warriors; the Comitatus of King Adaric, led by the man in person (24 elite Gepid warriors); and another large 48-figure Gepid warband.

Central Initial Wave: 5 units of 8 Huns

Central Reserve: 4 units of 8 Huns and a unit of 12 Hun nobles led personally by Attila.

Left Wing: the Ostrogoths of King Valamir.  Two large columns of 18 heavy lancers to either side of a large unit of 48 foot, with 18 light foot archers off to the side.  Valamir leads a reserve of 12 elite heavy lancers in person.

Hunnic detachment: two units of 8 Huns with a unit of 12 Hun nobles


The Romans, in blue:

Extreme Left Wing: 18 Elite Heavy Cavalry led by the Comes Equitum

Left Wing: 32 Elite Auxilia Palatina in column; two Legiones of 36 figures, including integral archers; and 32 Frankish loonies in column.  A second wave is comprised of 24 Limitanei Militia Grade troops and 24 German foot.  This large command, which is the most 'Roman' part of the army, is led by the Comes Peditum.

Lurking at the rear: Aetius with his Bukellarii, 12 Elite Heavy Cavalry.

Centre: two units of 12 Alans and a large unit of 18 Alan Nobles led by King Sangiban.

Right Wing: the Visigoths of King Theoderic.  Two large units of 36 Visigothic foot (including integral archers) are deployed to either side of the King's Comitatus, led by the old king himself (24 elite warband).  There is a small reserve of a dozen heavy horse to the rear.

Detached command: Theoderic's son Thorismund leads two units of 12 heavy cavalry, with an advanced screen of 12 skirmish archers sitting on the large steep hill to the front right of the army.

The battle starts late in the day, with only six full turns of daylight left.  Turn 7 will be dusk, and night falls at the end of Turn 8; these final moments will see progressive penalties applied to movement, shooting and melee.  Each army has nine breakpoints, with each unit and each general counting as one point.  The light cavalry and light infantry archers in the Hun army are worth half a point.  If neither army is victorious by nightfall, the Romans win by default.

The Romans can therefore afford to play a holding game, although they have placed a detached Visigothic command off towards the high hill, which is the only terrain feature present.  The Huns have likewise detached some troops in the same direction.

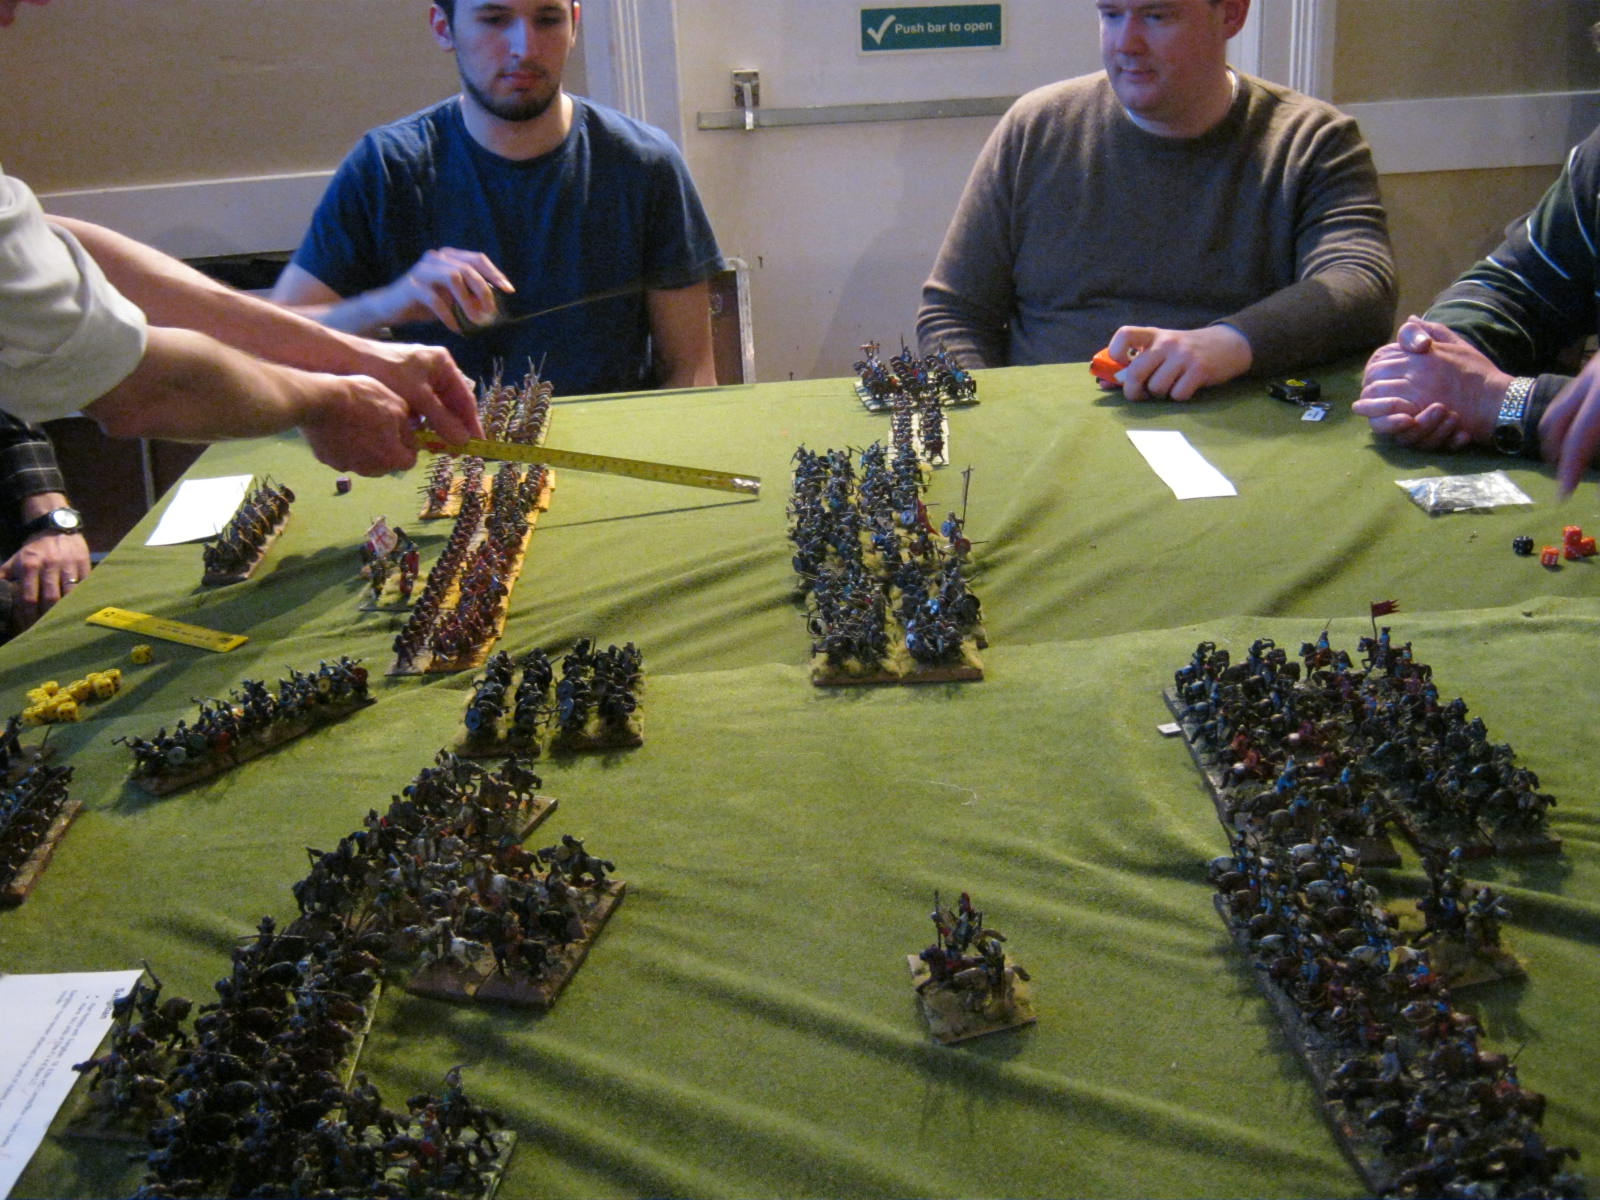
Some photos of the starting deployments:
First up is a shot of the entire field, taken from the Hun right flank.  Huns on the left of the photo.  My old Hinchliffe Skutatoi are standing proxy for the legions at the right of the shot.  We were able to fit in a dozen players, by giving the Gepid foot archers and cavalry column in the immediate left foreground to another commander.
Above is the Roman right wing from the viewpoint of a Hunnic helicopter pilot.  In the centre of the shot are the Visigoths, and a unit of Alan light cavalry can be seen to the right of the photo.  The reserve heavy cavalry is angled towards the supposedly open flank.  As umpire, I left the cavalry behind the hill off table.  Thomas is obviously deeply interested...
Photo number three shows the Alans in the centre of the Roman army, with Aetius lurking at the rear.  He is rather close to Sangiban - maybe he doesn't entirely trust him...
The final photo of the Roman deployment shows their left wing, the only Romans in the army.
Above, you can see the left of the Hun army: detached Hun cavalry to go wide if the need arises, and then the Ostrogoths as you look more into the centre of the army.
The centre: two massed waves of Hun horse archers, with Attila in attendance.  Unfortunately, the shot of the right wing Gepids and Heruls was rubbish, so I deleted that one.
Not wanting to waste any time, the entire Hun army advances en masse.  The first photo of the action (above) is taken from the Hun left flank, as they move their cavalry detachment wide around the hill.  They spread one unit of horse archers into skirmish formation and trade shots with the Visigothic foot archers on the hill, which is all they can see for the moment.  The Hun commander here has realised that something is behind the hill - he just doesn't know what it is...
The centre, however, is nowhere near as neat and tidy, or indeed sensible.  Despite their initial caution, the Romans have advanced the Franks at full speed to cramp the style of the central Hun horse archers.  This has broken up their advance, and mindful of the time constraints they have advanced the rest piecemeal.  The Alans start to pick them off one at a time by charging in - hey, who needs bows anyway?
Back around the hill, the Visigothic cavalry have advanced to engage the Hun general and his nobles, while the Visigothic skirmishers have disappeared under a hail of arrows, taking a unit of Huns with them.  At the top of the photo you can see the glorious charge of the Ostrogothic cavalry as they crash into the Visigothic foot - does this count as a civil war?
And here they are in all their glory.
Off into the distance, the centre continues to be a mess.  However, the Franks have managed to find themselves on the receiving end of a huge Gepid warband.  Both sides fail to withstand each other's ferocious charge, and when the dust clears, half of the effectives of the Franks lie dead in a single turn.  Maybe it wasn't such a good idea to use them to face off the Huns after all...
A quick sprint to the far end of the field finds the Gepid foot archers merrily shooting Roman Equites as the menacing column of Gepid and Herul cavalry closes in.  Those watching with OCD will no doubt note that my Skutatoi have mysteriously been replaced with proper Late Romans.
Back at the infamous hill, Thorismund leads his second unit of heavy cavalry towards the Huns, taking a few shooting hits as he goes.  It is Turn Five already!
In the centre, the carnage continues.  Valamir angles his remaining heavy horse to try to help Attila in the centre.  The Huns are dying in droves, and they aren't taking enough Alans with them.
In fact, the Huns' ranks are thinning rapidly, although they do finally manage to catch some Alans at a disadvantage.  In the far distance, the Franks have disintegrated, shaking the morale of a legion.  Even though the centre is not going Attila's way, a morale collapse on the Roman left could swing it back again in his favour.  At the very far end of the field, the Comes Equitum has managed to get himself killed by the charging enemy cavalry.  However, this does not seem to bother his troopers very much; despite the high shooting casualties and the death of their leader, they shrug it all off and keep on fighting.  This is effectively the crisis point of battle.  The Huns are losing badly in the centre, but the Roman left is in disarray.
I manage to head off to the other side of the table to take this photo of the Gepids pressing the Romans hard.  Just off to the left of this shot, Sangiban has managed to get himself killed, but the rest of the Alans don't seem to care too much.
Dusk is now falling, as shown by the large yellow die.  The Hun sub-general on the flank with the hill is about to have a bad time...
A photo of the rest of the field at this point as the Hun army collapses.  They do manage to take that pesky legion with them, but it held out just long enough.  Overall, Rome wins by 11 points to 5.

I thought it went well; we managed to keep a dozen players going for over two hours.  The Gepids were unlucky against the Equites, failing to make enough of an inroad after killing the general there, and the left flank of the Hun army eventually came unstuck.  The centre was not nice.  The Romans more or less just held their position, not even bothering to take the hill; they probably reckoned that it would slow down any enemy rash enough to come across it, so why bother committing oneself?

My own feeling is that this represents the historical battle quite well.  The Huns don't need to attack on their left, but can simply mask the hill and use their firepower to shoot anything that rears its head.  The Ostrogoths can push against the Visigoths, especially if they aren't forced to move further into the centre.  The Huns themselves can probably just shoot in waves, although the players on Tuesday quite rightly felt that this wouldn't give them the time they need to win the battle.  And of course the Gepids can always do what Gepids do best and charge everything in sight.  It will be interesting to see how it plays again at Carronade; here's hoping we get a Hunnic victory this time, because that would show that the scenario and the mix of troops are rightly balanced.

Cheers, all!

Monday 1 April 2013

Commanders for Chalons

Huns, Goths and Late Romans, oh my!
First up, the Huns.
These figures are by Foundry.
I bought three packs of these guys, and got another with the Foundry deal on multi-packs.
I painted them to be as bright as possible.  After all, the generals are going to get the pick of the looted expensive silks.
Each pack had two horsetail standards included - one with a single tail, and one with three.
I made two of each.
They will serve for Attila and two sub-generals, plus another one for Sangiban the Alan.
I know he's meant to be Caucasian, but what the hell, I got the figures anyway, and nobody will notice on the tabletop.  There's going to be quite a bit of proxying going on...
This means I will have enough command bases for a full Hun army, if I ever get around to it.
I tried to mix up the horse and clothing colours to give them some variation.
I also changed around the position of the figures on the base.
I like the Foundry steppe ponies - they look about right in terms of size compared with the riders.
The long grass is by Faller, with some cheap brown plastic wood for the earth and lighter flocking.
I like this look, which I originally tried out on my GEMS for Hastings (Generic Early Medieval Scum).
These should really stand out on the tabletop, especially when compared with my mix of much duller older figures for the army in general.
I'll probably use the triple-tail standards for the two main commanders.
Next up are the Goths.
These are by Musketeer Miniatures.  Flags and shield designs by Little Big Men Studios.
Again, I've mixed up the tunic colours to give some variation, while still trying to make them stand out.
I gave each foot base two standards.
There are Goths on each side - Ostrogoths fighting for Attila, and Visigoths fighting for Rome.
I haven't yet decided which to use for which side - it probably doesn't matter much.
The flags are actually for Early Saxons, but Steve at LBMS notes that they could be used for Goths as well.
There are also two cavalry bases, one for each side.
Some have horse armour, and so are obviously of the highest status.
They've probably been busy looting!
I left the horn blower looking quite plain by comparison.
The other base has two figures, for some variation.
I'll probably use this one for the command detached by Aetius to seize the heights to the front right of the Roman army.
The Comes Peditum of the Roman army.  He might have been Roman, but hardly anybody else was.
The Comes Equitum.  The Romans are again by Musketeer, with the ubiquitous LBMS transfers.
Finally, we have Aetius hinself.
The Roman standards are something of an experiment.
Instead of putting the flag transfers on paper, I used matt white Duchess satin that I bought from an old Glasgow institution, Mandors the fabric shop, aka known as the wargamer's shop of choice for off-cuts of useful stuff.  I wanted something that would look less flat than paper.  The material sliced well with a craft knife.  I'll try it again with two-sided flags at one point, to see how they work out, but it will be a while before I get the chance to do that.

This is pretty much my first proper foray into this period; now, it only remains to see how they fight...