Wednesday 24 February 2010

Confrontation in the Po Valley

A Roman expeditionary force composed of a standard consular army with support arrives in the Po Valley in the next instalment of the Empire Campaign. The Roman consul of the day sees a long line of Gallic skirmishers strung out across a low ridge and orders the army to deploy as standard. The Latin legions are in white to differentiate them from the rest of the army in red. Billy and I split the forces right down the middle; I take the left half, he commands the right.

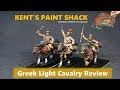
Simon deploys the Gauls (in blue) behind the ridgeline with large warbands offset towards the Roman army's right. William plays the rightmost half of the Gallic host, Mark the left.

Billy holds the Roman right in place while I attack with the left; in mirror-image fashion, the Gauls do the same. I manage to catch and destroy the Gallic cavalry facing me (they failed their control tests as non-light cavalry trying to evade), and I also wipe out their rightmost warband. Billy's Roman legion grinds against the next warband in line, but his Latins and Italians are in real trouble against the masses facing them. Even with the consul joining in to try to shore up the rightmost Latin legion, the warbands joyfully destroy everything in front of them and the consul goes down like a true hero of Rome. Their left wing forces destroy the Equites and Light Horse facing them.

The battle turns on whether Billy's Roman legion can break through before being flanked. The Romans finally beat their opponents, but the leftmost Gauls manage, slowly, to turn inwards and catch the Romans, winning the battle by fifteen figures. My forces were too far out of position to intervene in time, so the second consul withdraws the rest of the army in full order.

In campaign terms, this is actually a good result. The interface that we have evolved between Empire and Tactica II has resulted in a "flattening" of the modifiers in the boardgame, making it hard for attackers (even with a Great Captain) to make massive conquests quickly. The defeat in Cisalpine Gaul should stall Rome for another while and let us see how things develop elsewhere; otherwise, the Rise of Rome could occur very early on, and perhaps become unstoppable.

One of the problems with this kind of battle is that the lines can disintegrate, becoming rather messy after the strong infantry contingents finally break through. It took a while for the Gauls to consolidate and make the final push, but after their demolition of the Latins on the right it was pretty much certain they would do so. It just took a while, and wasn't very interesting to play out. Simon came up with an idea to to abstract this situation: allow medium or heavy infantry to head for the (artificial) table base edge and gain points by looting the camp/settlement. Games in the DBX stable make this a major feature; it is lacking from Tactica II because it's unnecessary in pick-up games under the rules. It would be easy enough to insert, say by allowing a unit to score damage against the enemy in army break points according to its size. This would penalise armies that unrealistically hug the table edge, and also provide a realistic victory objective. In the case of the game just played, the Romans are trying to push through the defending army and take the dominant settlement in the region, while the Gauls would gain by breaking into the Roman army's camp and lines of communication. This could save us some valuable time on club nights.

I do like this modification, and I'll suggest that we play it in the next fight in two week's time: the Macedonians make another determined push in the Pontus region against the last of the Great King's hoplite contingent.

Friday 19 February 2010

Current Empire Map

Phil B made a comment that a map would be useful to keep track of the Empire campaign's progress. Philip Sabin has very kindly given permission for me to be able to do this, so I have scanned in the two halves of the map to make a composite picture (above). It shows the relative strengths of the four main powers as they stand right now, at the start of Turn 4. From west to east, they are as follows:
  • The Carthaginians have not gained any territory, but have not lost any either. They control Africa (double value homeland); Numidia; and Iberia (double value).
  • The Romans have added to Rome itself by acquiring two territories. They own Italia (double-space, double value homeland) and Magna Graecia.
  • The Macedonians have added Thracia and Asia and still control their homeland region of Macedonia proper.
  • The Persians have lost two of their original eight provinces to rebellion (Bactria and Syria), and one to Macedonian conquest (Asia). They still control their homeland region of Parthia, plus Persia, Mesopotamia, Armenia and Pontus.


Wednesday 17 February 2010

Empire Turn 3: 330-320 BCE. A Summary

  • The Satrap of Syria rebels against the Great King, proclaiming himself the true King of Kings
  • A Carthaginian invasion fleet destined for Sicily is scattered by storms.
  • The Persians attempt to bring Syria to heel, and are defeated.
  • Rome conquers Magna Graecia.
  • The Macedonians are defeated in Pontus in a close encounter.
  • A Macedonian force moving southwards into Greece is easily repelled by an army led by Thebes.

Macedonians Are Pants!

Yesterday evening the Macedonians failed spectacularly to conquer Greece. There's not much to say, really, except that the Greek hoplites exterminated the phalanx with consummate ease. They were helped by the fact that the Thessalians went chasing off after routing light infantry instead of flanking the Sacred Band (a failed control test).

Afterwards I discovered that the Greek army was too large by 88 points, which is almost the equivalent of two units of peltasts, so the Macedonians probably should have succeeded in flanking the hoplite line. Having said that, the Macedonians did beat the Thracians in an earlier battle with an army that was far too large, so what goes around comes around. It can be rather dispiriting to be on the receiving of it, though...

The ineptitude of the Macedonians has left us with something of a problem in the campaign. Technically, they should have five moves this turn, but they have just lost two major battles in a row. In order to inject some variation into the game, we ruled that they lose one of their moves and carry the other two into the next turn. It means that their supposed "Great Commander" bonus is working out differently from the boardgame, but that shouldn't matter too much. We'll see if they can finally do some real damage in the next turn.

We rolled no pertinent rebellions, and specified that someone other than Macedon should go. A random roll came up with the steadily expanding Romans, and we rolled again to see where they would go: Cisalpine Gaul. So next week sees the Roman war machine make its first foray northwards. I'm looking forward to this game; I'll be able to use the newly painted legions I've been massing for the Zama game. Which can only mean a total massacre; as any gamer will tell you, newly painted figures will either destroy everything in front of them, or be mercilessly wiped out themselves. A bit of superstition there.

Monday 15 February 2010

Even More Lists

I've updated the two army list pages, mostly with classical western armies because that's what we tend to play at the club. I may have some other lists lying around in various piles of paper, but at least this is the majority of those easy to hand.

Thursday 11 February 2010

More Campaign Lists

Added the Macedonians and a couple of Successor armies to the mix (Lysimachus and Seleucus). The latter two are speculative, since the campaign hasn't reached that point yet.

Wednesday 10 February 2010

The Persians hold on

This is the battle plan of our latest campaign battle. The Macedonians have ignored the Persian rebel satrap in Syria, and instead proceeded along the Black Sea coast. They meet the forces of the local satrap, augmented by Greek colonist hoplites. If the Macedonians break through here, they will be encroaching upon the Persian heartlands, and will also deprive the Great King of access to his best troops: the Greek hoplites. A great deal is at stake.

The Persians are in red at the top of the map. Their right flank is refused, with a unit of levy angled to die at the end of the line. Such is the trust of the Persian commander. They have a forlorn hope of skirmish archers out in front. In the centre, the hoplites occupy a long low ridge, with the satrap's guard infantry in the position of honour on the right of their line. Another unit of levy is at the main line's extreme left, with a large unit of scythed chariots to their front. On the Persian left is a mass of cavalry: skirmishing Skythians, followed by a line of light horse, then the columns of Colonists and, finally, the best of the cavalry at the rear (Armenians and the Satrap's Guard). William played the Persian right, Simon their left; they divided the centre between them.

I set up the Macedonians, trying to second guess the Persians and getting it wrong. I had thought they would try to use the area of rough ground to their right to anchor their line, and I massed the Thracians to take it, with the Companions and Hypaspists right beside them. The phalanxes were as usual in the centre, with another unit of Hypaspists to their right along with the Thessalians. The right wing was composed of a mixture of Peltasts, good quality light horse and some Greek mercenary cavalry. We had a goodly number of excellent skirmishers spread across our front. Billy commanded the left hook; I took the right. We shared the centre.

The Persians charged their cavalry mass forward, but held their centre. I countercharged with our smaller but better quality force, in the hopes of cramping their style. This worked, as their best cavalry got stuck behind the melee, but it would be touch and go on this flank. In the meantime our centre and left ground forward. The Persians launched their scythed chariots into the phalanxes, doing quite a bit of damage before being destroyed. There were three potential decision points in this game as it developed:
  • Would our left punch crush the levy, flank the guard infantry and roll up the hoplites
  • Would their left punch break through, flank the Hypaspists and roll up the phalanx
  • Or would something give in the centre

In the event, the Persian guard infantry managed to hold on after the levy beside them were crushed. We lost the cavalry melee, but held the Persians just long enough to stop them intervening in the centre. The honours were even; the hoplites started to buckle on the ridge; but the punishment was too much for one of our phalanxes. The Macedonians lost by six figures. Another very close campaign battle.

Next week: the Macedonian home army attacks the Greeks. The rising power of Rome has engulfed the city-states of Magna Graecia and the Macedonians want to conquer Greece proper before the Romans make their way eastwards. The Carthaginians have had a lacklustre performance so far, and are not proving to be as great an enemy of Rome as was hoped in the planning circles of the Macedonian court. Better to pre-empt the western upstarts before they start to stomp all over the sacred grounds of Hellas with their caligae. In the meantime, the eastern armies can regroup for another, final assault on the hard hoplite carapace in the Pontus region.

Tuesday 9 February 2010

More Campaign Armies

Just added three more armies to the Empire page: Greek Confederacy; Thracians; and Syracusan. I also found out a useful buried feature for these pages, purely by accident. These new Blogger pages will allow you to copy in any text you have saved by "Control C" on your computer's Notepad by pressing "Control V". I know that this is a pretty standard procedure, but up until now Blogger has not allowed documentation to be uploaded at all. Any formatting will be lost, but if you have useful text you want to put on your blog without starting all over again, this is the way to do it. At least then all you have to do is edit, rather than write it all over again from scratch!

Sunday 7 February 2010

New Page for Army Lists

I have a backlog of various armies we have used, and not just for the Empire Campaign. I have set up a second page for these and first up is a series of three choices for the cohort-based legions, pretty much as suggestions for the period from the reforms named after Marius to the establishment of the Principate. Nasty Romans, in other words.

Later Achaemenid Persian

The lists grow apace; just added the army of Cyrus the Youngest to the Empire Campaign Page. I'm beginning to get the hang of this, so I may well add a page for non-campaign lists as well.

Saturday 6 February 2010

Tarentine Army List

Just added a list for the Tarentines to the Empire campaign armies page - link at the top left of the blog's main page. I'm going to keep doing this every so often; it's a way to use Blogger to gather together army lists in one accessible place.

Friday 5 February 2010

Army Lists for Empire

I've taken advantage of a new Blogger feature to create text pages; you'll find the link at the top left of my front page. There will probably end up being several of these; I see them as extra resources that are text-intensive and so would perhaps be rather boring if they appeared in full on the main blog itself. Interested people can click on the links and anyone else can just pass them by. Apparently a blog can have up to ten of these pages. My first one is for army lists generated by our Empire Campaign. I can think of another one for specific battle scenarios, aided by Battle Chronicler maps.

Monday 1 February 2010

On the painting tray for February 2010

January has been extremely productive: 24 Principes; 24 Triarii; 12 Velites; 4 command; and 12 Seleucid Agema. That's 64 foot and 12 cavalry, all in 25mm. A combination of some extra holiday time and being stuck in the house because of the severe weather gave me more painting time than I had expected. The plan for February is 24 Hastati; 24 Principes; and 4 command figures. That will complete half of the final legion for Zama.