The Carthaginians try again. I don't have any Spanish, so out come the old Romans and Greeks to fill in. This time the Iberians are ensconced in an area of open ground, bounded by steep hills and rough ground:
William picked and deployed the Carthaginians, in blue at the top of the map. They have two equally powerful cavalry forces on the flanks, each comprising a unit of 12 Punic heavy cavalry, a unit of 18 Gallic heavy cavalry, and 8 light cavalry in support. Their centre is a mixture of Punic elite heavy spearmen, Scutarii, and Libyan medium spearmen, all in 24-figure units deployed in three ranks. There is also a deep Gallic Warband of 36 figures. Loads of skirmishers are in front of the army. Billy and William divide the whole lot between them; Billy takes the right half of their force, William their left.
I chose and set up the defending Iberians. The left wing comprises two units of 18 Caetrati in the steep hills to our extreme left; two units of 8 light cavalry, and a block of 18 medium horse in column. Gordon runs this lot. On the right, I take command of one unit of 18 Caetrati deployed wide in the rough; two units of 8 light horse; and a second medium cavalry column of 18 figures. The centre is composed of three units of 36 Scutarii interspersed with two units of 36 Celtiberians, all in three ranks. We split these between us. The usual skirmishers are to the front. I went more or less for a symmetrical set up, with the main body held as far back as possible so as to give the skirmishers time to hurt the enemy as they advance towards us. I'm also hoping that one or other of our wings will be able to take advantage of the terrain. Caetrati are nasty.
 |
| Above: the Carthaginian forces advance in the centre. Billy's cavalry hangs back - they don't want to get too close to the steep hills, which are off to the left of the photo. |
 |
| The Carthaginian left wing advances. Note that there is plenty of space for skirmish fighting. |
 |
| Gordon's advance on our left. We have a little bit of superiority here because of the two units of Ceatrati, and Gordon decides to use it to advantage. |
 |
| Meanwhile, on our right I do the opposite of Gordon, and retire the cavalry. |
 |
| The photo above is taken directly from behind our centre. In the distance, you can see Gordon's Caetrati occupying the foremost steep hill and facing down the enemy heavy cavalry. There's still plenty of space for our slingers. |
 |
| The view from behind our centre. Not many skirmishers are left, but it will still take the Carthaginians a while to get to grips with our main line. |
 |
| On our right, my cavalry have regained their order as the enemy continues to advance. |
 |
| On our left, Gordon's light cavalry retires as the large unit of enemy Gallic heavy cavalry skirts the steep hill and moves more into the centre. This occludes the loan massed infantry unit behind them. The terrain is beginning to cramp their style. Gordon's slingers like the looks of a nice big heavy cavalry target... |
 |
| The Carthaginian centre closes the distance. In the event, the skirmishers more or less cancelled out here. |
 |
| All is quiet for the moment on my flank, as the enemy heavy cavalry hangs back a bit because of the terrain here. |
 |
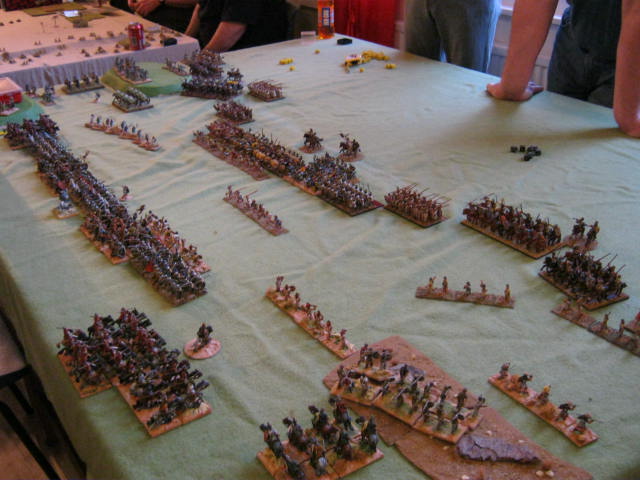
| An angled shot of the main part of the field, or at least as much of it as I could manage. |
 |
| The enemy closes in on my force. They have much more weight here; I'm hoping that the terrain will slow them down. |
 |
| A closer shot of Gordon's command. The Caetrati are having fun on their hill. The slingers are having even more fun as they merrily shoot the Gallic cavalry to half strength. The light horse have prudently retired into the valley between the two steep hills. On the Carthaginian side, the damage to the Gauls causes the endmost infantry to move out in support. |
 |
| On my wing, I throw my Caetrati forward to slow down the enemy advance even more, thus buying time for the troops in the centre and centre right. |
 |
| Gordon senses weakness and charges in his cavalry and infantry at the same time; this is the only part of our army that is going forward, but if it works out we may well be able to turn the enemy line at this point. |
 |
| The struggle on Gordon's wing carries them and some of our infantry well beyond the rest of the battle. The main Carthaginian infantry has advanced beyond this point - they are off the bottom edge of the photo. |
 |
| The situation in the centre - a desperate struggle all across the line. Can Gordon break through on our left, or will my right collapse first? |
 |
| A close-up of my right just before it gives way entirely. However, the timing works in our favour as a cascade morale failure wipes out the forces facing Gordon and he rolls up the enemy line, just before my lot runs for it. |
The Iberians see off the Carthaginian interlopers yet again! Next up: Ptolemy attacks Syria, so we will use Ptolemaic Egyptian versus Seleucid.


.jpg)


.JPG)


Those armies are enormous!!!! I´m jealous :-D
ReplyDeleteCheers
Paul
Another great battle report. Looks like a fun campaign.
ReplyDeleteCheers, both, and thanks for looking. If you make it along to Carronade on Saturday, Brian please do look us up. We're running a 25mm Battle of Khadesh game, figures by one of our club members. Which means I don't need to do any work!
ReplyDeleteGreat battle report, aplogies for not visiting sooner as I forgot to put you on my blogroll, that's been rectified.
ReplyDeleteNo worries - I found out that even if you tell Blogger that you're following a blog, you still have to add it to your blog list.
ReplyDeleteBy the way, do let us know if you ever make it over in this direction, and we'll see if we can host a game for you. Same goes for anyone else who might be coming to Scotland!
Cheers
Paul
GET HIM!
ReplyDeleteHi Biff, I think you've just invented a new Roman battle cry! Or maybe a film title: Get Hannibal!?
ReplyDelete