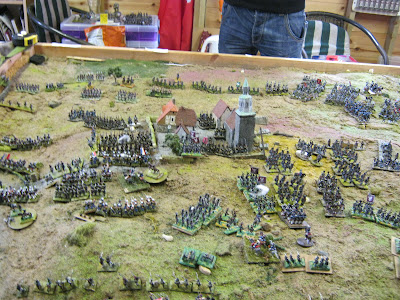
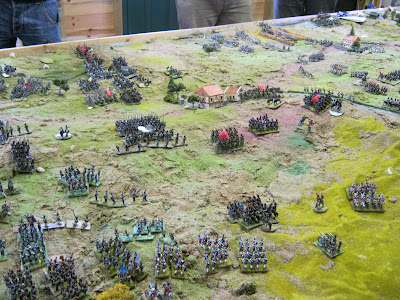
The first photograph shows the start of the battle. The Prussians are on the left, climbing the hill towards a town called Gross-Gorschen behind which the advance elements of Ney's Corps can be seen (on the right as you look at it). At this point the Prussians are more numerous - at the top left is a cavalry brigade, with three infantry brigades converging on the town itself , bearing in mind that a Prussian 'brigade' is the same size as everyone else's divisions. Of to the right of the photo the rest of Ney's troops are marching forward as fast as they can, as are two more French Corps at the far end of the table beyond the Prussian cavalry.
The second photo is more of a close up of the immediate action. Note that the Prussian cavalry have swept well beyond the town - I had thought they would simply hang back to watch the Prussian left as the assault goes in.
Photo number three shows some local Prussian cavalry success - a regiment of Dragoons has just ridden down two French infantry battalions in quick succession (they both advanced a bit too far and failed to form hasty square - not a good position to be in...). I felt the brave Prussians deserved their own photo. Gross-Gorschen is off to the top of this picture.
I was busy as depute umpire, but I took the long table shot above as the struggle for the centre intensified. You can probably make out indistinct masses of French coming down the table lengthwise in the background of this shot (commanded by Bertrand and Marmont). The foreground shows yet another French infantry Corps, under Macdonald. Facing them, the cream of the Russian Cuirassiers and Grenadiers have also shown up on table. By this point in the game there are a lot of bodies in and around Gross-Gorschen in the middle of the field, both alive and dead.
Above is another long table shot, taken slightly later than the previous one. Latour-Maubourg's Cavalry Corps can be seen at the bottom right of the shot. Just arriving now at the left are the Russian Guards.
We represented the disjointed nature of the Allies' arrival by allowing the various formation commanders to decide for themselves what to with their forces as they arrived. Nominally, I was Wittgenstein, the ineffectual Russian C-in-C; I would be allowed to send aides to try to get them to do what I wanted, but the initial orders would be up to them. The photo above is a case in point; instead of the Cuirassiers and the Guard Cavalry both heading off in the direction of Latour-Maubourg's horse, the Russian Guards charged into the midst of the enemy infantry to their front, destroying two foot batteries and so depriving the French here of any decent artillery support.
We cleared all clutter from the table to take a series of photos depicting the crisis point of the battle. Ney's initial two infantry divisions have been destroyed, as have two of Blucher's large brigades. The photo above shows Bertrand's corps in the foreground advancing on the Prussian left, with Marmont's troops beyond them (taken from the Prussian baseline). Napoleon's right pincer is closing...
Slightly further into the centre, the left foreground shows a detached Russian Light Cavalry Corps; they got lost en route to the field and ended up at this end of the battle instead of next to the rest of the Russians, who are well off to the right of this picture. Cresting the ridge line right in the middle of the photo are the French Imperial Guard.
Above is the massive conflict around Gross-Gorschen. At the bottom right you can just see the advance troops of Yorck's Corps. Almost everyone seems to be heading towards that town!
Off to the right of the Prussians, however, the Russians seem intent on starting another battle of their own. The Grenadiers have taken the village here and are already giving the French in front of them a hard time. Just to their right, the Guard Cavalry has reformed ready for another go, and behind them the Guard Infantry is streaming on. Masses of French infantry and cavalry await them at the top right of the shot. At the very bottom right you can just make out the Russian reserve artillery arriving as well.
Above is the final photo of this moment from the Allies' perspective: Russian Cuirassiers are in place to try their luck against Latour-Maubourg's Cuirassiers, and a second wave of Russian Guard Light Horse have just appeared at the bottom right of the picture. This is shaping up into an epic cavalry confrontation.
A full table shot from the flank.
Now we continue to work around the battlefield, starting from behind the French left, at the same time as the photos above. The shot of the cavalry confrontation was a bit rubbish, so I deleted it, but here you can clearly see those nasty Russian Grenadiers in their town, and their friends in the Guard behind them. This is not an encouraging sight from the French perspective! The gap to the left of the picture is where the guns used to be.
Above is the struggle for Gross-Gorschen as it looks to the French.
Finally, the more open terrain to the French right, with the two Infantry Corps closing in towards the Prussian centre.
Back to the French left/Allied right as the Cuirassiers clash. All eyes turned towards this flank for a change!
The dust clears, and the French have got slightly the better of it. At this point I had to leave, but not before I managed to lose the Guard Light Cavalry that was supposed to support the Cuirassiers.
Everyone seemed to have a good time. These big multi-player games make good social occasions. The rules were adapted Shako II, using 25mm distances with 15mm figures to speed things along a bit. Historically, many of the formations took a long time to get into action, and that wouldn't be fair on the folks who travelled to Glasgow. The order of the events remained the same, though, and by the time of the final photos everyone was involved. I might see if I can post photos by other folks at one point - a big thank you to everyone who made it!


.jpg)


.jpeg)


.jpg)


Oh wow! That is epic.
ReplyDeleteNow that's a grand scale battle. Marvelous set up and terrain. Best, Dean
ReplyDeleteFantastic !!!! and my favourite year of the Napoleonic War. Five stars Caliban great looking game.
ReplyDeleteWell, that's a bit of a change from Ancients! Magnificent :)
ReplyDeleteCheers,
Aaron
Thanks for looking, and for the kind comments. It was definitely a load of fun!
ReplyDeleteAbsolute epic game, looks amazing!
ReplyDeleteLooks absolutely stunning, Paul! Phew. Simon
ReplyDeleteThat really is a spectacular looking game..the size of the armies and the Terrain is all very inpressive!
ReplyDeleteI'd love to have a set-up like this. In the meantime, I shall continue to help out with the scenarios and the logistics, so that I can learn for the time I am able to run something like this myself!
ReplyDeleteAt the moment, Willy hosts a couple of these massive games per year. Next up is probably going to be Poniatowski's section of Leipzig.
Like Jonathan, my first thought is "epic" but the word is not quite big enough for what you put on here. Hats off to the owner/painter of the massive Napoleonics army.
ReplyDeleteThanks, Monty, it was a team effort!
ReplyDelete