No map this time, because it would take me longer to draw it than it did to play the game! We used our standard Bactrian Greek list to defend against an Indian invasion. Billy ran our heavy cavalry on the left, David the phalanx in the centre, and I took the light troops on the right, flank resting on a piece of rough ground. Apart from that, terrain was minimal. Simon constructed the Indian army, which Gordon deployed, running the right wing of their army. Paul played their centre and Bill played the left half. Their deployment was extremely heavy on their right, with loads of elephants interspersed with cavalry and skirmishers. Their centre was mostly composed of massed chariots and infantry. Their left was refused, with a small flank guard of chariots and cavalry.
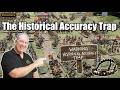
Photo number one, above, shows the impressive force facing Billy on our left.
The Indians close on Billy's troops. Although the enemy is far heavier overall, they have deployed with a large number of small units. This will give them flexibility, but if Billy gets lucky they could end up with an unfavourable morale situation if one or two were to be destroyed.
The centre at about the same time.
And my wing. Nothing is facing my light troops, but they will have to be patient as they wear down the blocking force so as to turn the infantry flank.
Contact on Billy's wing. He gives the Indians a real scare here despite the weight facing him.
The chariots rumble forward to pin the phalanx in place. Note the second wave of Indian elephants to the left pf the photo, waiting for the way to clear so that they can flank the phalanx.
I press on my wing.
A close up of my fight. I have managed to get some Greek medium cavalry into contact against the poorer quality Indian horse. I will clear the flank of the enemy infantry, but it's probably going to be far too late to be of any consequence.
The rest of the battle was too depressing by this point, so I took one last shot of my limited triumph. Our left and centre were completely destroyed.
Next up: the Ptolemies attack the Later Seleucids in Mesopotamia. After that, we have decided to change the way Empire plays a little to make the grand struggle between Rome and Carthage into a more detailed wargames campaign, with quicker resolutions and fewer but more important battles. The reason for this is that both Simon and I will be irregular attendees over the summer, and we have the armies - this should keep things moving despite the disruption...


.jpg)


.JPG)


Beautiful to look at. I too find that if things go south too quickly, it's hard to document one's destruction!
ReplyDeleteHi Monty, thanks for looking. I wanted to take some photos of the Indian army, which belongs to one of our club regulars. Shame about the disastrous defeat though...
ReplyDeleteFantastic looking game and figures. Inspiring stuff. Dean
ReplyDeleteHi Dean, I can't take the credit for the Indians; our man Simon has been building that lot on and off for years. It would be good to aim for a replay of Hydaspes sometime...
ReplyDelete