Thursday 28 October 2010

The Macedonians Conquer Greece

But not without a fight!  This is the third time the northern barbarians have attempted to conquer the so-called cradle of civilised learning in our campaign.  Simon chose the Macedonians and Marco set them up.  I chose and deployed the Greeks.  Terrain is open, with a long ridge for the Greek Hoplites.
The invading Macedonians are in blue at the top of the map.  From their right, the Macedonian deployment has a small but powerful right wing comprising a unit of elite Thessalian Heavy Cavalry and then the start of the Phalanx, with the Hypaspists in the position of honour.  Their centre comprises four units in the Phalanx.  Their left is six units of Peltasts, four in the front line and two in reserve, with a column of Companions and another of Prodromoi.  The overall set-up is compact, with cavalry flexibility on both flanks and skirmishers out front.  They know that the Greek Confederation can have plenty of Peltasts, but that their cavalry is poor at best.

The Greeks set up with a left wing comprising four Peltast units and the Theban Sacred Band ready to move out to the left.  The centre is five units of Hoplites.  The right is a lone unit of mediocre Athenians tasked with protecting the far end of the line.  The Thebans have overall command, and are quite happy for their traditional Athenian foes to die on the right.  The army has skirmisher superiority across the front.  There are no cavalry.  Most of the photographs are taken from the perspective of the Greek, because that's where I was, with the exception of the occasional full table shot:

A long table shot of the two armies, taken from the Macedonian right wing.

The skirmish lines clash in the centre.

The infantry advances; the Macedonian cavalry move out to their left.
 
Table shot from the Macedonian right flank lines.
 
The Greek Peltasts advance; the Hypaspists move out to the right as the Phalanx echelons.

On the Greek right, the Athenians move off to meet the enemy horse.  This opens up a gap to their left, but there's not much I can do about that; I reckon the enemy Peltasts will annoy me here, but I can probably afford it.

Back on my left, the Peltasts chuck javelins at the Thessalians as one lone unit sacrifices itself against the Hypaspists.

The Sacred Band and attendant Hoplites wait for the Hypaspists; slightly forward to their right the infantry lines clash.

At the other end of the infantry lines, the Macedonians desperately throw in Peltasts to hold up the Hoplites' overlap.

The Athenians meet the Companions and some Peltasts.

Back on my left, the Hypaspists charge the Sacred Band and their friends - grudge match!

The Thessalians vanish under a hail of javelins and my victorious Peltasts prepare to hit the Hypaspists from behind.

Close-up of the Sacred Band and the Hypaspists.  These guys really do not like each other.

A longer-range shot of the desperate infantry struggle.  The Macedonians are doing well in the centre, but both extremities of the Phlanx are in trouble.  The Greeks are rolling well and this is going to be very close indeed.

The Peltasts join in against the Hypaspists.

A close-up the action here.

On my right the Athenians have finally died, taking Peltasts and the Prodromoi with them.  The Companions have moved to threaten the right rear of the Hoplites.  The Macedonian Peltasts have been shredded here by the dozen.

Macedonian breakthrough in the centre!  I send my general in to shore up the morale of the Hoplites here, but he gets hinself killed in the fighting just as the centre starts to give; both of the Hoplite units to either side are disordered.
And then it was all over.  As the remainder of the Companions charged home, the disordered Hoplites broke, and the Macedonians got their victory.  Just in time, too.  The Hypaspists were wiped out, and the Phalanx unit at the leftmost end of the Macedonian line was three figures away from breaking.  That would have sent the invaders packing.

When I saw the Macedonian deployment, I went for broke.  Rather than wait for them to come to me, I brought the Hoplites off their hill.  I reckoned that it would be a race against time for me to try to use my left wing superiority before they used theirs.  Staying put would allow the enemy to pick on the Athenians at their leisure and then roll up the line.  It almost worked.  Next up: the Persians attempt to take Bactria from the Sakae.  We play this in three weeks' time.

Friday 15 October 2010

Disaster for Carthage in Iberia

On Tuesday we played an attempt by Carthage to conquer Iberia.  Deployment map:

Carthaginians in blue at the top
Simon chose and set up the Carthaginian attackers; William constructed and deployed the Iberians.  I won't go into details about the armies, since I hope the troop types are reasonably clear from the map.  Marco commanded cavalry on the Carthaginian right, with input from Simon; Billy was the infantry commander in the middle; and Ian had the rest of the cavalry on their left.  Marco was opposed by Gordon on our left, with a powerful cavalry force; William was in the middle with the infantry; and I was in command of the high quality light infantry on our right, facing Ian.  The Carthaginians had a decent number of skirmishers, but they were well outnumbered right across the front by the Iberians.

This is the first time we have tried an Iberian army in the campaign, and only the third time I have ever seen them on the tabletop.  William based his army on how he perceived the Iberians to have operated: a cloud of skirmishers; a large number of very good light infantry types (Caetrati and Lusitanians); a good cavalry contingent as a mixture of heavies, medium horse and light troops; and Scutarii and Celtiberians for the infantry.  William also rolled up the terrain, and it was not good for the defenders: a low hill to their left, and a steep hill on their right.  This explains his deployment of almost all of the cavalry to the left and light infantry in the vicinity of the steep hill.  He kept the main infantry contingent as far back as he possibly could.
Iberian cavalry envelops Carthaginian right
The photograph above shows the development of Gordon's cavalry attack on the Iberian left flank.  It's taken from behind the left centre of the Iberian army.
Advance of the Carthaginian infantry
The second photograph (above) shows the centre of the field at the same time as the first picture.  For some reason that I don't quite understand, the Carthagnian centre stayed still for two turns.  This gave the Iberians the opportunity to start a double envelopment in the hope that at least one wing would come through to threaten a flank of the Carthaginian infantry line.  By keeping his own infantry well back, William was able to postpone a central clash for a considerable time, allowing his skirmishers to clear those of the enemy and start to hurt the Gauls in the front line of the infantry mass.  As you can see fron the photograph, he had plenty of space to do so.
The Iberian horse continue their envelopment
Picture three speaks for itself, I think, as the threat develops.
Fight on the right
The shot above is of my wing at the same time.  The difference in colour is due to this part of the table being furthest from the lights at the club.  This is just to prove that I was doing something on my flank, apart from chatting.  Honest.
The Carthaginian centre closes - but is it too late?
In the picture above, William has started to echelon his leftmost infantry units forward to halt the Carthaginians closest to the oncoming Spanish cavalry.  His leading infantry unit has even been brave enough to attack some enemy cavalry.
A longer, angled shot of the same moment
I hope the photo above conveys more of the situation on the centre and left of the Iberian army.
Here comes the crunch!
In the picture above, the cavalry starts to arrive from the Iberian left flank.  The invading infantry has only just begun to come to grips with the left foremost Iberians.
The final moments

And then it is all over.  Both Carthaginian flanks have collapsed, and before their infantry can finally get to grips with their recalcitrant foes, the cavalry hits them from behind and one of the Gallic units succumbs completely to the ongoing hail of missile fire.  It's a while since we have seen that, but they have been bearing the brunt of it all the way across the table.  Gordon lost one unit of light horse and I lost the unit of medium cavalry; minor losses by comparison.

Next up in two weeks will be the Macedonians attacking Greece again.  Many of the players have expressed the opinion that the Macedonians might need to give themselves the option to intervene in Southern Italy; taking Greece would give them the jumping-off point they would need to do so.  This opinion is an understandable result of the longstanding Roman inability to halt the Carthaginian juggernaut.  Until recently, that is.  At the very least it will make a welcome change from destoying Persian armies.

Friday 1 October 2010

Finally: a Roman attack succeeds

On Tuesday, the Romans defeated Carthage in Magna Graecia in the latest of our Empire campaign battles.  Deployment map:

Carthaginians in blue at the top; Romans in red

Simon constructed the Carthaginian army and provided the figures.  He also drew up the deployment.  I did the same for Rome.  The battlefield is open in the centre, with a mixture of hills towards the flanks, especially on the Roman left.

The Carthaginian right wing (Marco commanding in his second Tactica game, with rules assistance from Simon): three units of 12 good heavy cavalry on the outside, the Punic nobles held in reserve, plus two units of 8 Numidians.  Billy commands the infantry centre, which is composed of a unit of 24 Italian foot, deployed in two shallow ranks; a large unit of 48 Elite Punic heavy spearmen in four ranks; a large unit of 48 Spanish in four ranks; and a second unit of 24 Italians in two ranks.  In front of the large blocks are some sacrificial Gauls: two units of 24, each in four ranks.  In front of the leftmost Italian infantry unit can be found another 8 Numidians, attached to the central command.  In front are two units of 12 javelinmen in a skirmish line, and another unit of 12 in a block.  William plays the army's left wing, comprising three units of 8 Numidians, one of them on the extreme flank beyond a steep hill, plus a unit of 12 heavy cavalry in reserve.  He also has two units of 10 slingers and a group of 10 javelinmen.  From the Roman perspective, it would seem that the Carthaginian commander is hoping to absorb the impact of the legions in the centre with his large group of units there, and outflank the Roman left wing.

I lay out the Romans overall as a slight variation on the deployment that was foiled by the Spanish in the previous encounter.  The left wing comprises all of the Italian foot: a large unit of 36 in three ranks to block off the extreme end of the line, with two units of 24 in three ranks to link in with the legions themselves.  The details of this deployment are Gordon's idea.  To the front is a unit of 12 slingers.  Ian commands the four legions in the centre, each of which comprises 11 Velites; 12 Heavy Hastati with pila; and 24 Heavy Principes with spears.  I command the right wing, which is where the cavalry is packed: two units of 18 Medium Equites in two ranks, with a unit of 8 Italian light horse to either side.  I also have 12 skirmish archers.
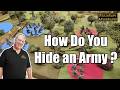
The Italians move into their usual sacrificial position
The battle begins with the legions doing...nothing.  The Roman high command has decided that they can afford to wait and see how it develops before committing to the attack.  In the meantime, the Italians start to manoeuvre into their flank position on the Roman left (photograph above).
An unusual sight: Equites advancing
The Romans mirror this with a tentative cavalry advance on their right (above).  I'm pretty sure I can protect the right flank of the legions against the relatively small enemy contingent on this flank.  If I get lucky, I might even be able to send some cavalry into the centre as well, doing to the Carthaginians what they usually do to me.
The Legions mass
In the meantime, the Legions continue to do very little, permitting the Carthaginians to advance at will.  At the top left of the photograph above, you can see the Italians moving out from their blocking position on the Roman left wing.  The reason for this is that the Carthaginian heavy cavalry have taken a rather circuitous route across the hills, and Gordon sees an opportunity for the Italians to overlap the enemy infantry centre. 
The gap seen by the Italians
His reasoning is that the cavalry flanking movement is taking the enemy horse quite far away from the centre right flank of their infantry formations.  I hope this opportunity can be seen clearly from the picture above.  If he times it right, he might be able to use our Italians to crush those on the enemy side before their cavalry can intervene.
Clash in the centre
By this time, the Carthaginian infantry is getting quite close, led by the Gauls.  In order to stall their advance, Ian charges in with the Hastati of the two leftmost legions.  This will hold up the two large units behind them for a while, allowing possibilities to develop to either side of the centre.
An opportunity for the Legions to our centre right
In mirror image fashion, a large gap has opened to the left of the Carthaginian infantry.  The unit of Numidians here has desperately tried to slow down the Legions to no avail.  It has been crushed by the Hastati, and now the front line starts to bear down on the hapless Italians (they are off to the right of the photograph above).  We are hoping that at least one of our central overlaps will win the game for us.  I have given up getting anywhere fast with my cavalry.  I have superiority in numbers on the right flank, but the steep hill is cramping my style somewhat and the enemy skirmishers are being very effective.  This part of the game is turning into a mutual meat grinder.

The Carthaginian cavalry finally makes it across the field

Above: our large unit of Italian foot faces off against all three of the enemy heavy cavalry units while our smaller units crush their opponents and make the overlap on their infantry.  One group of Numidian light horse manages to squeeze into a gap in our line that has presented itself as a result, but we calculate that we can just about afford this.
The struggle in the centre
The shot above shows the infantry combat well underway in the centre of the field.  At the top right of the picture the victorious Hastati are advancing after crushing the Italians, which has in turn allowed the Principes of the inside right (Roman) Legion to hit the big unit of Spanish at an angle.  Although there are twice as many Spanish, this advantage is cancelled out by double dice for the Principes.  You will probably notice the absence of Gauls by this point as well...

The final cavalry clash on our right
The photo above shows that the cavalry fight is still ongoing.  Very quickly, though, the foremost unit of Equites is destroyed by the Carthaginian heavies on this flank.  The final units on each side then come together.

But it is too late for what happens here to make any difference.  The Spanish and the Principes fight each other to destruction, and the Carthaginian army flees.  With hindsight, my performance on the Roman right was mediocre at best, but as things turned out I didn't need to swing into the centre anyway.  What won the battle for Rome here, or rather lost it for Carthage, was the extreme concentration of large blocks of infantry in the centre.  This allowed the Romans to overlap the centre on both sides, and the flexible Legionaries took advantage.  On the far left of the Roman line, the large block of Italians did their job facing off the main force of enemy cavalry.

That's it; the Romans have finally beaten Carthage on the attack.  Carthage goes next in the turn, but they have decided to try to regain territory in Spain.  The mid-game Victory Points calculation is beginning to loom, and since Iberia is worth twice as many points as Magna Graecia, it makes sense to attack in the west.  We are also getting rather fatigued with the 1st Punic War!  Having said that, Carthage in this period probably shouldn't be so single-minded as their enemies.  Maybe the War Party has suffered a defeat in council back home, as the glory of defeating Rome is now wearing off.

I'm looking forward to this.  A fight between Carthaginians and Iberians should be a good match as well as a relief from the usual.  We play this in two weeks' time.

On the painting tray: October 2010

Last month I painted 48 Republican Roman Hastati; the plan is to do the same again in October.  That will finish the legionaries for my Republican proconsular army.