It was the turn of our group of ancients players to host the traditional multi-player game on the first meeting of the month, so we tried out the scenario for Chalons. This is a scaled down version of my original; thanks are due to Simon MacDowall for graciously allowing me to adapt his scenario. Map of the field:
The Hun army is in red at the top of the map. It is composed of a confederation of Huns, Heruls, Gepids and Visigoths. Commands are as follows:
Right Wing: a column of 18 Gepid and Herul heavy lancers; 18 Gepid light foot bowmen; a large warband of 48 Gepid foot warriors; the
Comitatus of King Adaric, led by the man in person (24 elite Gepid warriors); and another large 48-figure Gepid warband.
Central Initial Wave: 5 units of 8 Huns
Central Reserve: 4 units of 8 Huns and a unit of 12 Hun nobles led personally by Attila.
Left Wing: the Ostrogoths of King Valamir. Two large columns of 18 heavy lancers to either side of a large unit of 48 foot, with 18 light foot archers off to the side. Valamir leads a reserve of 12 elite heavy lancers in person.
Hunnic detachment: two units of 8 Huns with a unit of 12 Hun nobles
The Romans, in blue:
Extreme Left Wing: 18 Elite Heavy Cavalry led by the
Comes Equitum
Left Wing: 32 Elite Auxilia Palatina in column; two Legiones of 36 figures, including integral archers; and 32 Frankish loonies in column. A second wave is comprised of 24 Limitanei Militia Grade troops and 24 German foot. This large command, which is the most 'Roman' part of the army, is led by the
Comes Peditum.
Lurking at the rear: Aetius with his Bukellarii, 12 Elite Heavy Cavalry.
Centre: two units of 12 Alans and a large unit of 18 Alan Nobles led by King Sangiban.
Right Wing: the Visigoths of King Theoderic. Two large units of 36 Visigothic foot (including integral archers) are deployed to either side of the King's
Comitatus, led by the old king himself (24 elite warband). There is a small reserve of a dozen heavy horse to the rear.
Detached command: Theoderic's son Thorismund leads two units of 12 heavy cavalry, with an advanced screen of 12 skirmish archers sitting on the large steep hill to the front right of the army.
The battle starts late in the day, with only six full turns of daylight left. Turn 7 will be dusk, and night falls at the end of Turn 8; these final moments will see progressive penalties applied to movement, shooting and melee. Each army has nine breakpoints, with each unit and each general counting as one point. The light cavalry and light infantry archers in the Hun army are worth half a point. If neither army is victorious by nightfall, the Romans win by default.
The Romans can therefore afford to play a holding game, although they have placed a detached Visigothic command off towards the high hill, which is the only terrain feature present. The Huns have likewise detached some troops in the same direction.
Some photos of the starting deployments:
First up is a shot of the entire field, taken from the Hun right flank. Huns on the left of the photo. My old Hinchliffe Skutatoi are standing proxy for the legions at the right of the shot. We were able to fit in a dozen players, by giving the Gepid foot archers and cavalry column in the immediate left foreground to another commander.
Above is the Roman right wing from the viewpoint of a Hunnic helicopter pilot. In the centre of the shot are the Visigoths, and a unit of Alan light cavalry can be seen to the right of the photo. The reserve heavy cavalry is angled towards the supposedly open flank. As umpire, I left the cavalry behind the hill off table. Thomas is obviously deeply interested...
Photo number three shows the Alans in the centre of the Roman army, with Aetius lurking at the rear. He is rather close to Sangiban - maybe he doesn't entirely trust him...
The final photo of the Roman deployment shows their left wing, the only Romans in the army.
Above, you can see the left of the Hun army: detached Hun cavalry to go wide if the need arises, and then the Ostrogoths as you look more into the centre of the army.
The centre: two massed waves of Hun horse archers, with Attila in attendance. Unfortunately, the shot of the right wing Gepids and Heruls was rubbish, so I deleted that one.
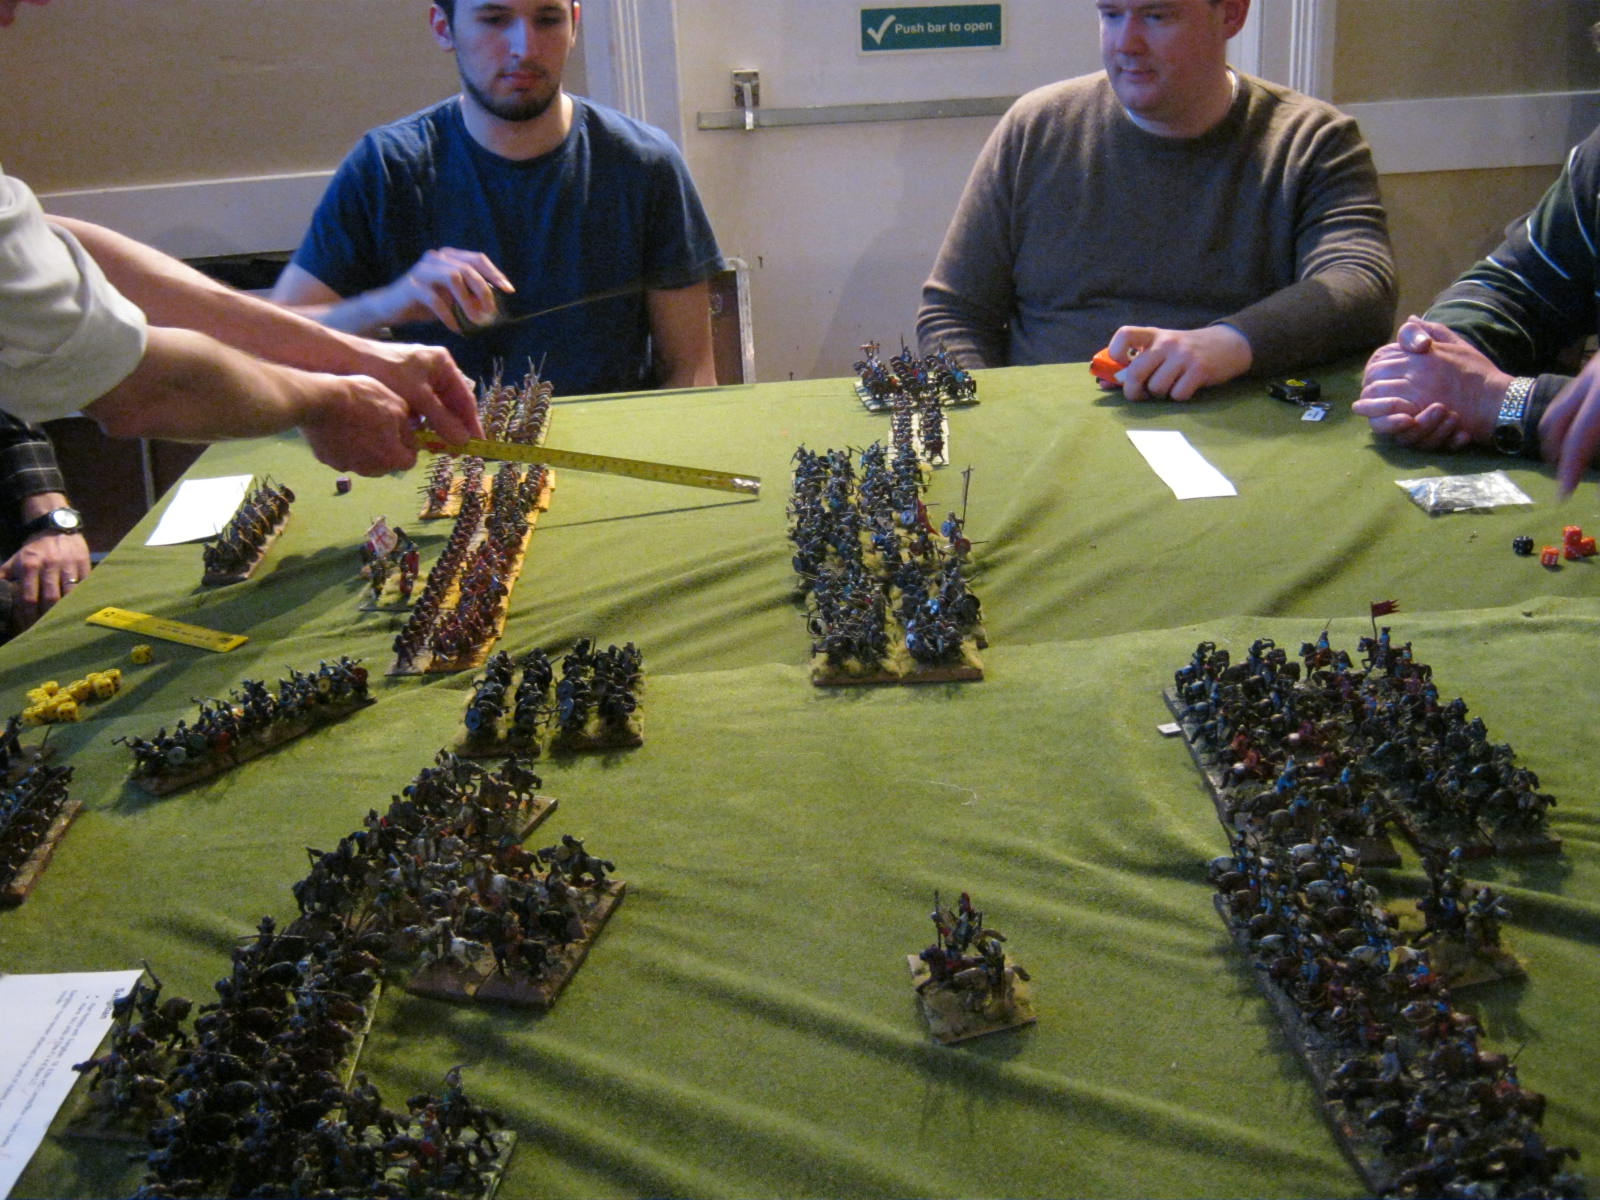
Not wanting to waste any time, the entire Hun army advances en masse. The first photo of the action (above) is taken from the Hun left flank, as they move their cavalry detachment wide around the hill. They spread one unit of horse archers into skirmish formation and trade shots with the Visigothic foot archers on the hill, which is all they can see for the moment. The Hun commander here has realised that something is behind the hill - he just doesn't know what it is...
The centre, however, is nowhere near as neat and tidy, or indeed sensible. Despite their initial caution, the Romans have advanced the Franks at full speed to cramp the style of the central Hun horse archers. This has broken up their advance, and mindful of the time constraints they have advanced the rest piecemeal. The Alans start to pick them off one at a time by charging in - hey, who needs bows anyway?
Back around the hill, the Visigothic cavalry have advanced to engage the Hun general and his nobles, while the Visigothic skirmishers have disappeared under a hail of arrows, taking a unit of Huns with them. At the top of the photo you can see the glorious charge of the Ostrogothic cavalry as they crash into the Visigothic foot - does this count as a civil war?
And here they are in all their glory.
Off into the distance, the centre continues to be a mess. However, the Franks have managed to find themselves on the receiving end of a huge Gepid warband. Both sides fail to withstand each other's ferocious charge, and when the dust clears, half of the effectives of the Franks lie dead in a single turn. Maybe it wasn't such a good idea to use them to face off the Huns after all...
A quick sprint to the far end of the field finds the Gepid foot archers merrily shooting Roman Equites as the menacing column of Gepid and Herul cavalry closes in. Those watching with OCD will no doubt note that my Skutatoi have mysteriously been replaced with proper Late Romans.
Back at the infamous hill, Thorismund leads his second unit of heavy cavalry towards the Huns, taking a few shooting hits as he goes. It is Turn Five already!
In the centre, the carnage continues. Valamir angles his remaining heavy horse to try to help Attila in the centre. The Huns are dying in droves, and they aren't taking enough Alans with them.
In fact, the Huns' ranks are thinning rapidly, although they do finally manage to catch some Alans at a disadvantage. In the far distance, the Franks have disintegrated, shaking the morale of a legion. Even though the centre is not going Attila's way, a morale collapse on the Roman left could swing it back again in his favour. At the very far end of the field, the
Comes Equitum has managed to get himself killed by the charging enemy cavalry. However, this does not seem to bother his troopers very much; despite the high shooting casualties and the death of their leader, they shrug it all off and keep on fighting. This is effectively the crisis point of battle. The Huns are losing badly in the centre, but the Roman left is in disarray.
I manage to head off to the other side of the table to take this photo of the Gepids pressing the Romans hard. Just off to the left of this shot, Sangiban has managed to get himself killed, but the rest of the Alans don't seem to care too much.
Dusk is now falling, as shown by the large yellow die. The Hun sub-general on the flank with the hill is about to have a bad time...
A photo of the rest of the field at this point as the Hun army collapses. They do manage to take that pesky legion with them, but it held out just long enough. Overall, Rome wins by 11 points to 5.
I thought it went well; we managed to keep a dozen players going for over two hours. The Gepids were unlucky against the Equites, failing to make enough of an inroad after killing the general there, and the left flank of the Hun army eventually came unstuck. The centre was not nice. The Romans more or less just held their position, not even bothering to take the hill; they probably reckoned that it would slow down any enemy rash enough to come across it, so why bother committing oneself?
My own feeling is that this represents the historical battle quite well. The Huns don't need to attack on their left, but can simply mask the hill and use their firepower to shoot anything that rears its head. The Ostrogoths can push against the Visigoths, especially if they aren't forced to move further into the centre. The Huns themselves can probably just shoot in waves, although the players on Tuesday quite rightly felt that this wouldn't give them the time they need to win the battle. And of course the Gepids can always do what Gepids do best and charge everything in sight. It will be interesting to see how it plays again at Carronade; here's hoping we get a Hunnic victory this time, because that would show that the scenario and the mix of troops are rightly balanced.
Cheers, all!


.jpg)


.JPG)







.JPG)


.jpg)


+(1).jpg)
+(1).jpg)