Saturday 28 June 2014

Slingshot

I have recently started as editor of Slingshot, the journal of the Society of Ancients.  I started gaming with tanks while I was still at school, because tanks are cool, but I spent more and more time in the hobby when I encountered ancients thanks to an old friend who was leaving school.  He sold me his 25mm Byzantine army, and that got me hooked on ancients/medievals and that figure scale.  I played a lot of 6th edition WRG while I was an undergrad, and I was well aware of the existence of the Society and Slingshot.  I didn't become more involved at that point, though, because I was going off ahistorical match-ups and the interminable debates in the journal about Ghaznavid super troops

Well, that's how it seemed to me at the time.  More recently, though, ancients gaming has massively diversified and there are loads of great rulesets and figures out there.  Plus I've been in a steady club group for years now, and we have enough figures between us to make mostly historically plausible games the norm - hence our ongoing campaign.  I joined the Society properly a few years ago and started to put on large display games at some of the Scottish shows.  I then joined the Society's committee and then, a couple of months ago, took the plunge with Slingshot.  Because of my day job (don't worry, I won't bore you with the details), dealing with large amounts of text doesn't bother me very much.  So why not?

Anyway, I thought I should start to include some of this on t'blog here, since it is now taking up some more of my gaming time, and that's what the blogging thing is for.  So if you're reading this, why not have a look at the Society's website and maybe join?  Slingshot is free to members.  There are six issues a year, and it contains a whole range of ancients and medievals historical and gaming material.  It isn't as glossy as some of the others out there, but then it isn't a commercial enterprise.  Joining the Society gets you the journal, plus access to the discussion forum with some very knowledgeable folks, and DISCOUNTS.  WITH MANUFACTURERS.  Did I mention the DISCOUNTS by the way?

And yes, this is a call for papers!  Getting published doesn't pay, but then you will be in very good company, and many contributors just like to see their musings in print.  So why not go for it?  Oh, and the Society has negotiated discounts with many manufacturers...

Thursday 26 June 2014

Dies Martis Campaign Page Updated

Due to our growing experience with slightly unusual armies of the Hellenistic period, we are beginning to produce some middling pike and thureophoroi lists.  I have updated the campaign page with suggestions for these armies, which are not covered in the basic lists for the playtest version of Tactica II.  They lack the punch of the earlier heavy phalanx-based armies, but are colourful and interesting in their own right.

Wednesday 25 June 2014

A Scrap in Thessaly

The veteran forces of Rome turn their attention southwards to the Achaean League after finally disposing of the Macedonians.  I constructed the Roman army and Simon made up their erstwhile opponents.  Photos are mostly taken from my position in charge of the left of the Roman army:
First up is the relative deployments at my part of the field.  I have some mercenary peltasts and slingers in a patch of rough, while my Latin legions are facing some low hills.  Fortunately for me, the enemy isn't here in strength - a lot of skirmishers plus some light horse.  Further into their centre, towards the right as you look at it, you can see some of their many Thureophoroi.  It's me against Simon here.
The shot above shows the armies' centres - lots of legionaries in the foreground commanded by Billy, facing a lot of Thureophoroi plus a couple of elite pike phalanxes (Graham).  At the top right you can just about make out a very large Thracian warband and some of the enemy's heavy cavalry.  They will be punching with their left, then...
Over on our right, all of the Roman and Latin Equites plus some Crtean Archers under Malcolm's control are facing the Thracians, heavy cavalry and light cavalry, including 'Tarentine' types (Gordon).  Our plan is going to have to be simple: wheel to the attack with the legions, and prey that our cavalry can hold up on this wing while the legions win the battle for us.
A long table shot from off to my left wing, showing the full deployments.  The armies are somewhat offset, with the Romans more in strength on our left, and the enemy's main force facing our right.  The winner will be whoever manages to get their leftmost weight in where it counts.  This is a very similar Roman deployment to one that went horribly wrong in Iberia due to a combination of attacks from woods and weighty Celtiberian warband assaults on the Latins.  I decide to try it here because I am expecting to face Thureophoroi and I reckon the legions can take them.  Basically, I have groups of Hastati and Principes in blocks of 24 figures (three ranks) with no Triarii - the legions are not at maximum strength after all that previous fighting in Epirus and Macedon.
I start off on my wing with boring regularity, as predicted.
A full table shot after the first turn.  All is, again, as expected.
Another full table shot after turn two.
A close-up of my wide open left.  My peltasts sweep forward, pressing the enemy light cavalry to retire, while the Latin legions advance upon the Thureophoroi.
And here they are, about to go and do what legionaries do best.
Some of my Latins and Billy's Romans crunch into the same unit of Thureophoroi.
Others attack the nearest pike phalanx.  Billy holds back his extreme right legion as the Thracians press forward against Malcolm's heavy cavalry.  No point in risking the endmost legionaries yet - we are a bit nervous on this wing.
On our far right, Malcolm's cavalry wisely stays out of contact for as long as possible.
Back on my wing, the peltasts continue their march.  Simon throws in one unit of light cavalry to try to stop the legionaries for as long as possible.  I don't even bother to waste pila on them.
Contact in the centre.
On our far right, Malcolm's cavalry are all still alive.
The legions have disposed of the first wave of Thureophoroi.
Now they go for the remainder.
A final shot of the action on our right, while it lasts.

The Thurephoroi are completely wiped out, and Billy's legions finish off the phalanxes as well, just as the enemy finally disposes of Malcolm's cavalry.  Gordon's forces here are just about the only Achaeans to make it off the field to run for temporary safety in Attica.  The Roman machine grinds on.

I have rolled for the next series of campaign events - mostly minor acquisitions.  However, the main event will be much further east as the Egyptians take advantage of the Parthian army being way out near Bactria.  The Ptolemaics invade and take Elymais.  The Parthian response, though, is vigorous.  Their army swings by their capital in Parthyene to pick up reinforcements, and the whole formidable host descends upon the invaders.  We'll play that one in two weeks' time.

Sunday 15 June 2014

Legionary Command

Four command bases for an elite legion with cloaks:
Figs by Companion Miniatures, except for one of the officers at left - the guy with the red crest is by Crusader, the idea being that he is the senior military tribune.  I want one of these per legion as part of the eagle base, as well as a mounted legate.  In our rules, a cohort comprises eight figures.  These four bases give me command stands for an eagle cohort plus three others.  Any more might be overkill, and at least they'll look the part in triplex acies.  Shield designs are by Little Big Men, for 1st Corps Republican Romans.  The transfers are not right for these shields, but some judicious cutting plus a muddy wash and then some paint does wonders.   I also made the cohort standards slightly different, with varying numbers of decorations in sliver and gold.  I want these guys to look rough and ready, proper campaign types.  Besides, I already have the legion's casualty markers, courtesy of chopped-up Wargames Factory plastics and the same decals - I made those a few years ago for the big Zama project.
A view from behind, with all those cloaks billowing in the wind.  They're not as time-consuming to paint as the Gallic cloaks I did for the Alaudae, but they still took a while.  Onwards and upwards: next will be the rank and file, and well nasty they are too.

Thursday 12 June 2014

Roman Casualties

The finest kind:
I've done this before, when I needed casualty markers for my Republican Romans for Zama.  Nobody at that time made plastic Republicans, so I used Wargames Factory plastics and cut the bases off them.  The good thing about that is I can use them for this project as well.  I reckon I'll need five for each legion, so that means I already have enough for four legions - two with red shield designs and two with white.  The guys in the photo above are for the Alaudae, who have blank red shields so that I can also use them as auxiliaries.  The notches are for my home made clock-face dials. The running total for this year now stands at 296 foot; 105 cavalry; and seven elephants with riders. 

Campaign Events

Campaign events update:

Autumn 146
  • The Romans crush the Macedonian army in a battle in Epirus that sees the end of Macedonia as a Great Power.  It's all over bar the shouting.
  • Scipio Aemilianus invests Numantia while the Celtiberian army melts into the mountains, frustrating Roman attempts to bring them to battle.
  • The Ptolemaic Egyptian expeditionary force arrives in Babylonia.
  • The Parthians move into Drangiana.
  • The Achaeans move into Sparta.

Winter 146
Not a lot happens as the various powers tax the peasantry as usual.

Spring 145
  • The cruel Roman siege of Numantia continues
  • The Romans extend their iron grip throughout the Epirus region in preparation for a move on Pella.
  • Babylon is annexed by the Ptolemaic Empire.
  • The Parthians annexe Drangiana.
  • The Achaeans annexe Attica.

Summer 145
  • Numantia falls to the might of Rome.
  • The Romans advance on Pella.
  • The Ptolemies advance into Characene.
  • Taking advantage of the sudden collapse of Macedonian power, the Ptolemaic army in Asia Minor moves into Pamphylia.
  • The Parthians swarm into Paropamisadae.
  • The Achaeans annexe Attica.

Autumn 145
  • Pella surrenders and the great Macedonian Empire is finally dismembered.
  • The Ptolemies annexe Characene and Pamphylia.
  • The Parthians annexe Paropamisadae.
  • The Achaeans advance into Thessalia

Winter 145
  • Claiming hereditary rights to the lands of the Old Persian Empire as the last successors to Alexander, the Ptolemies declare war on Parthia.  The latter whip up popular support against the aggressors by claiming to be the heirs to the Achaemenids.
  • The Romans order the Achaeans to vacate Thessalia.  Incensed by this high-handed provocation, the Achaeans declare war on Rome.
  • Various independent minor states emerge with the demise of Macedonia, namely the Thracians, Galatians and Pergamenes.

Spring 144
  • The Romans advance from Numantia into Carpetania, trying to force the remaining Iberian tribes into battle.  Led by a cunning guerilla leader named Viriathus, the Lusitani in particular frustrate Roman efforts.
  • The Romans in Macedon attack the forces of the Achaean League in Thessalia.

Next up on the tabletop, then, will be the Romans against the Greeks.  We will have to come up with a hypothetical late Hellenistic Greek army.  Probably something like a reasonable amount of okay light and medium or heavy horse; loads of thureophoroi medium foot and light infantry; and some skirmishers.  The value of the Greek army is actually slightly higher than that of Rome.  Even if Rome wins, they will probably need reinforcements from home to finish off the League.  More exciting times in Greece, then...


Another battle in Epirus

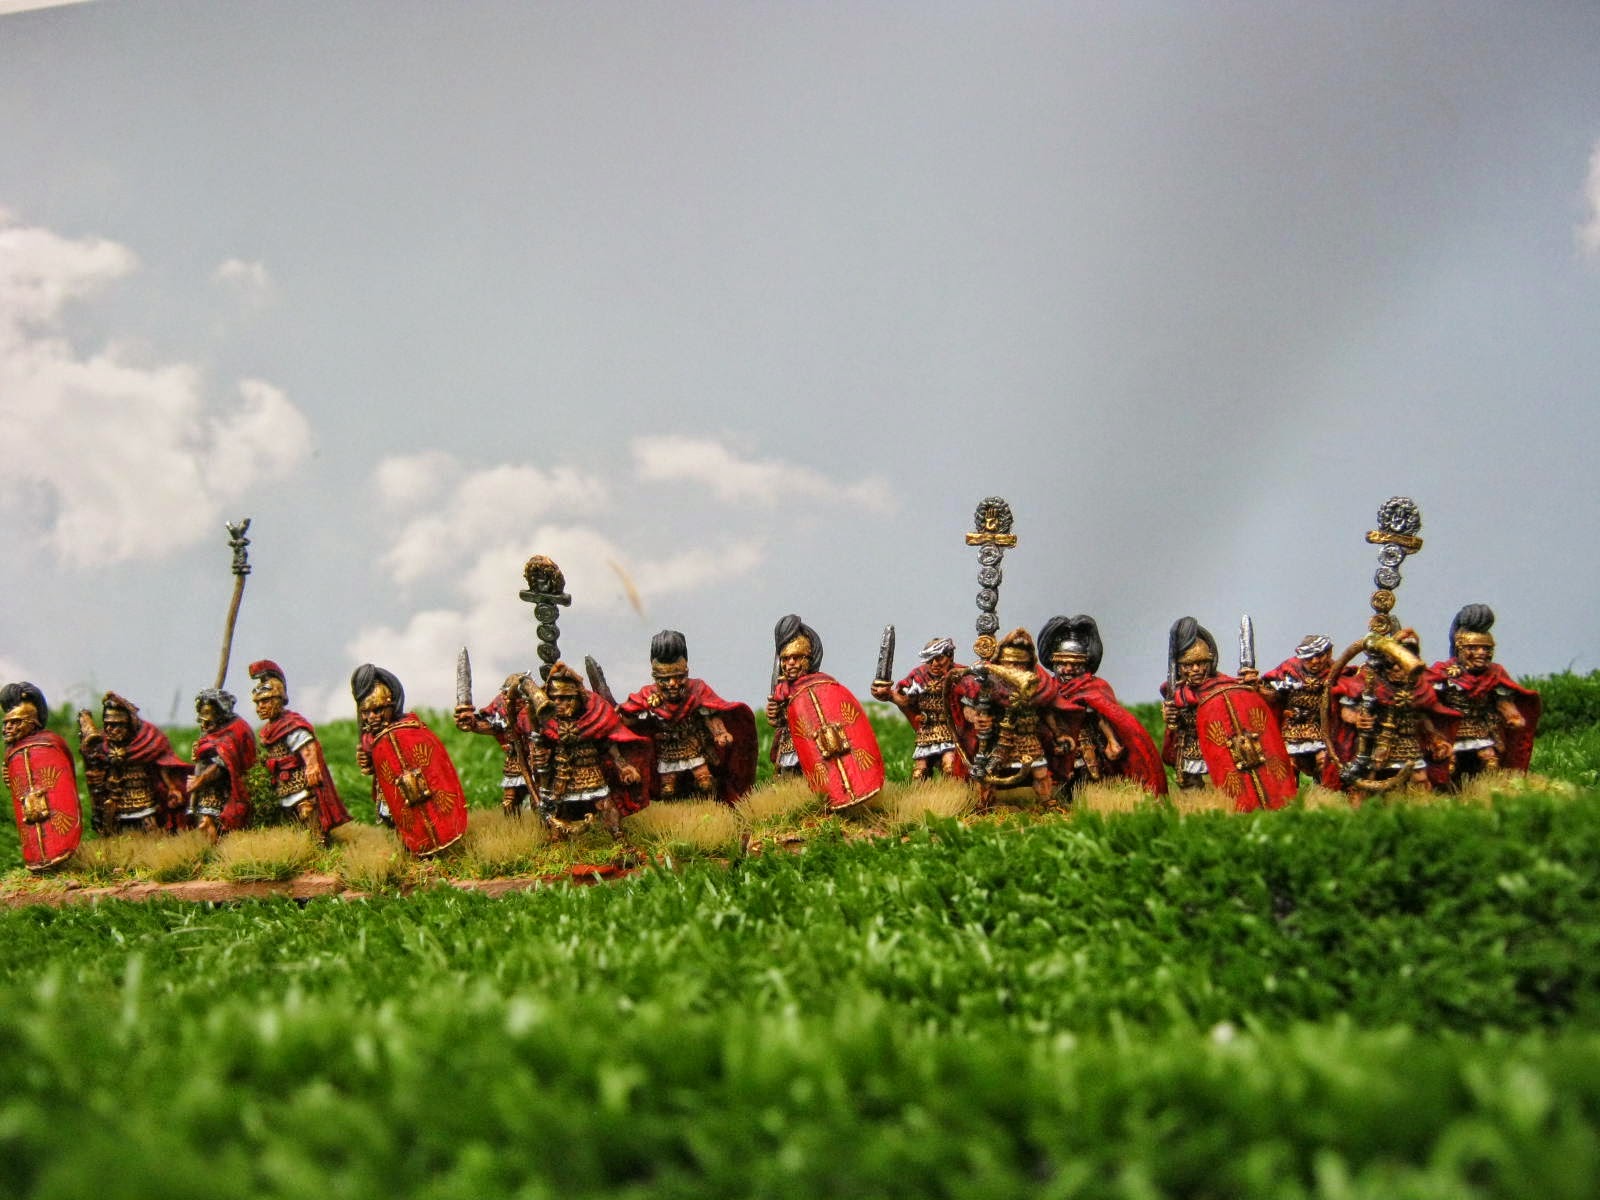
The Romans and Macedonians are at it yet again in the campaign.  I work out the Roman army composition and command it, while Simon does the same for the opposition.  The Roman army is slightly larger because of reinforcements from the victorious troops in Carthage. This is my first club game for about six weeks now, and I usually have very good luck after a hiatus.  Most of the photos are taken from my Roman perspective, with a few long table shots, almost all taken from my left wing, thrown in for good measure.  First up we have the Macedonians facing my left:
Their extreme flank is covered by a couple of light cavalry units of eight figures each, and then there are two large blocks of 48 Thureophoroi each.  The standard Late Macedonian list doesn't have these guys, but Simon has been painting them and wanted them on the table.  Just at the right of the photo, you can see some of the central Macedonian pikes.  
And here they are in all their glory.  A unit of 32 elite pikemen is stationed next to the Thureophoroi, and then come three units of 48 heavy pikemen.
Their cavalry weight is on their left this time: a unit of 14 elite heavy cavalry, then 16 line heavy cavalry and then 8 Light Cavalry.  The usual skirmishers are spread across the front of the army.
A long table shot of both deployments taken from my right, just off the edge of the previous shot - Romans on the left as you look at it, Macedonians to the right.  I didn't know what to do, so I set up the Romans in their usual boring symmetrical patterns.  You can probably make out the second line of legionary Principes.  No third line, though, because I wanted to extend my frontage a bit by brigading the Triarii together and setting them up as part of the front lines.  
I attack with my left, where the Latins are stationed, because I think I have superiority here.  The Macedonians think the same, and hold back at this point, angling a little to face the threat.
The opposite is true of the situation on my centre and right, where the Romans are stationed.  They are facing the mass of the phalanx proper, while the Latins have it relatively easy against Thureophoroi.
My right wing is really going to struggle, I think, because this is where all of the Macedonian heavy horse is concentrated.  I do have some Aetolian peltasts to help out, but it won't be enough.  I hold back as long as I can over here.
A long shot of the situation after the first turn's movement, taken from my left (Latin) flank.  On the left, the Thureophoporoi can clearly be seen holding back.  In the centre right of the photo my Latins are advancing.  At the top you can hopefully see the surging Macedonian cavalry and the cowering Romans.
A view of the infantry centres at the same moment.  The little lumps represent some low hills, which both sides are more or less ignoring.
My Latin legionaries go in; the ones fighting the Macedonian elites have a particularly bad time of it.
On my right, I do something rash and attack with my cavalry, instead of simply waiting for the inevitable.  The reason for this is that the Macedonian cavalry have angled a bit to facilitate their intended breakthough onto the flanks of the legions.  This does break up their frontage a little bit, though, and I decide to commit before they can get all of their cavalry into me at exactly the same time.  There is a brief moment where I can put two units onto the enemy's line cavalry, and it counts - my dice are indeed rather good.  Basically, I am hoping to break up the momentum of the enemy advance here while hoping for the best in the centre.
A long shot of the whole field at this point, from the Latin left again.  In the immediate left forefront of the photo you can see my wing pressing forward.  Basically, both armies are leading with their left.  I have no idea how it will go.
A closer shot of my extreme left.  Graham has arrived and is now running this part of the battle for Macedon.  He tries to slow me down as much as he can, but he is up against it, not helped by the fact that here at least my slingers have done a lot of damage to his light cavalry.
The Latin Triarii have gone into the Thureophoroi, and the Hastati are fighting the other unit of Thureophoroi and the Macedonian elites.  The Velites and the enemy skirmishers have pretty much exhausted one another and are nowhere to be seen.
The Hastati of the Roman legions go into the pikes, while the Triarii hold back; they are at the right of the photo as you look at it.  My pila are rubbish, but the gladius makes short work of the pikemen.  This is important, because the Romans rely on the Hastati to make some inroads, and once they are gone, the idea is for the Principes to finish the job.  In several previous battles, it didn't work.  It looks as though it might this time, though, so long as I can keep the enemy Heavy Cavalry off my legions' right flank.
Fortunately for me, the Roman Equites are putting up one hell of a fight.
The same cannot be said of the Latin Hastati facing the elite pikemen.  The gap shows where the Hastati used to be.
The unit of light cavalry at my extreme right has been destroyed, but unfortunately for Simon, his own lights go haring off in pursuit instead of turning onto my stubborn Equites.  This relieves the pressure on me here a little.
Back on the other side of the field, my cavalry is beginning to threaten the extreme flank of the Thureophoroi.  Unlike the Roman light cavalry, the Latins have easily seen off their opponents.
I now have a problem in my centre, as the Macedonian elites follow up their victory and crash into the Latin Principes.  Fortunately for me, they do very well indeed.  The heavy infantry fight is now going well in my favour.
The final phalanx now goes into my Roman Triarii, who are temporarily helped out by the Peltasts.  They very quickly cease to exist.
This is how my right looks at this point: very vulnerable indeed.
Back to my left, with a quick photo of my infantry in action against the Thureophoroi.  My one unit of Peltasts here lasts longer than it should.
Back at the extreme right, disaster strikes the Macedonian heavy cavalry.  The line unit suddenly crumbles, and the elites fail their morale test, plunging into disorder.  That insane charge I made has paid off in real style.  I thought my Equites would buy me some time, but instead it looks as though they are going to destroy everything in front of them.  
At exactly the same moment, the Latin Equites break though on the other flank.
In they go.
Simon finally manages to reign in his mad pursuing light cavalry and gets ready to throw them in against the Roman Triarii.  I hope it will be a case of too little, too late.
The phalanxes are now seriously up against it.  Although they have finally pushed aside the Hastati, the Principes punish them mercilessly.  Things are not looking good for the courageous Macedonians.  Even the light cavalry attack fizzles.
A gratuitous shot of Latins ganging up on what's left of the brave Thureophoroi.

The Macedonians collapse and their army is almost entirely destroyed.  The Latins crush the Thureophoroi and the elite pikemen, while the Romans destroy one of the pike blocks and the enemy cavalry.  The only bright spot for Macedon is that my heroic Equites don't make it into the centre, as they are wiped out to a man by the remnants of the enemy skirmishers.  A very comprehensive Roman victory.