Saturday 24 November 2012

Grand Contest in Iberia

A major battle takes place in Iberia as Hannibal stands firm against Scipio's advancing Romans.  And here they come:
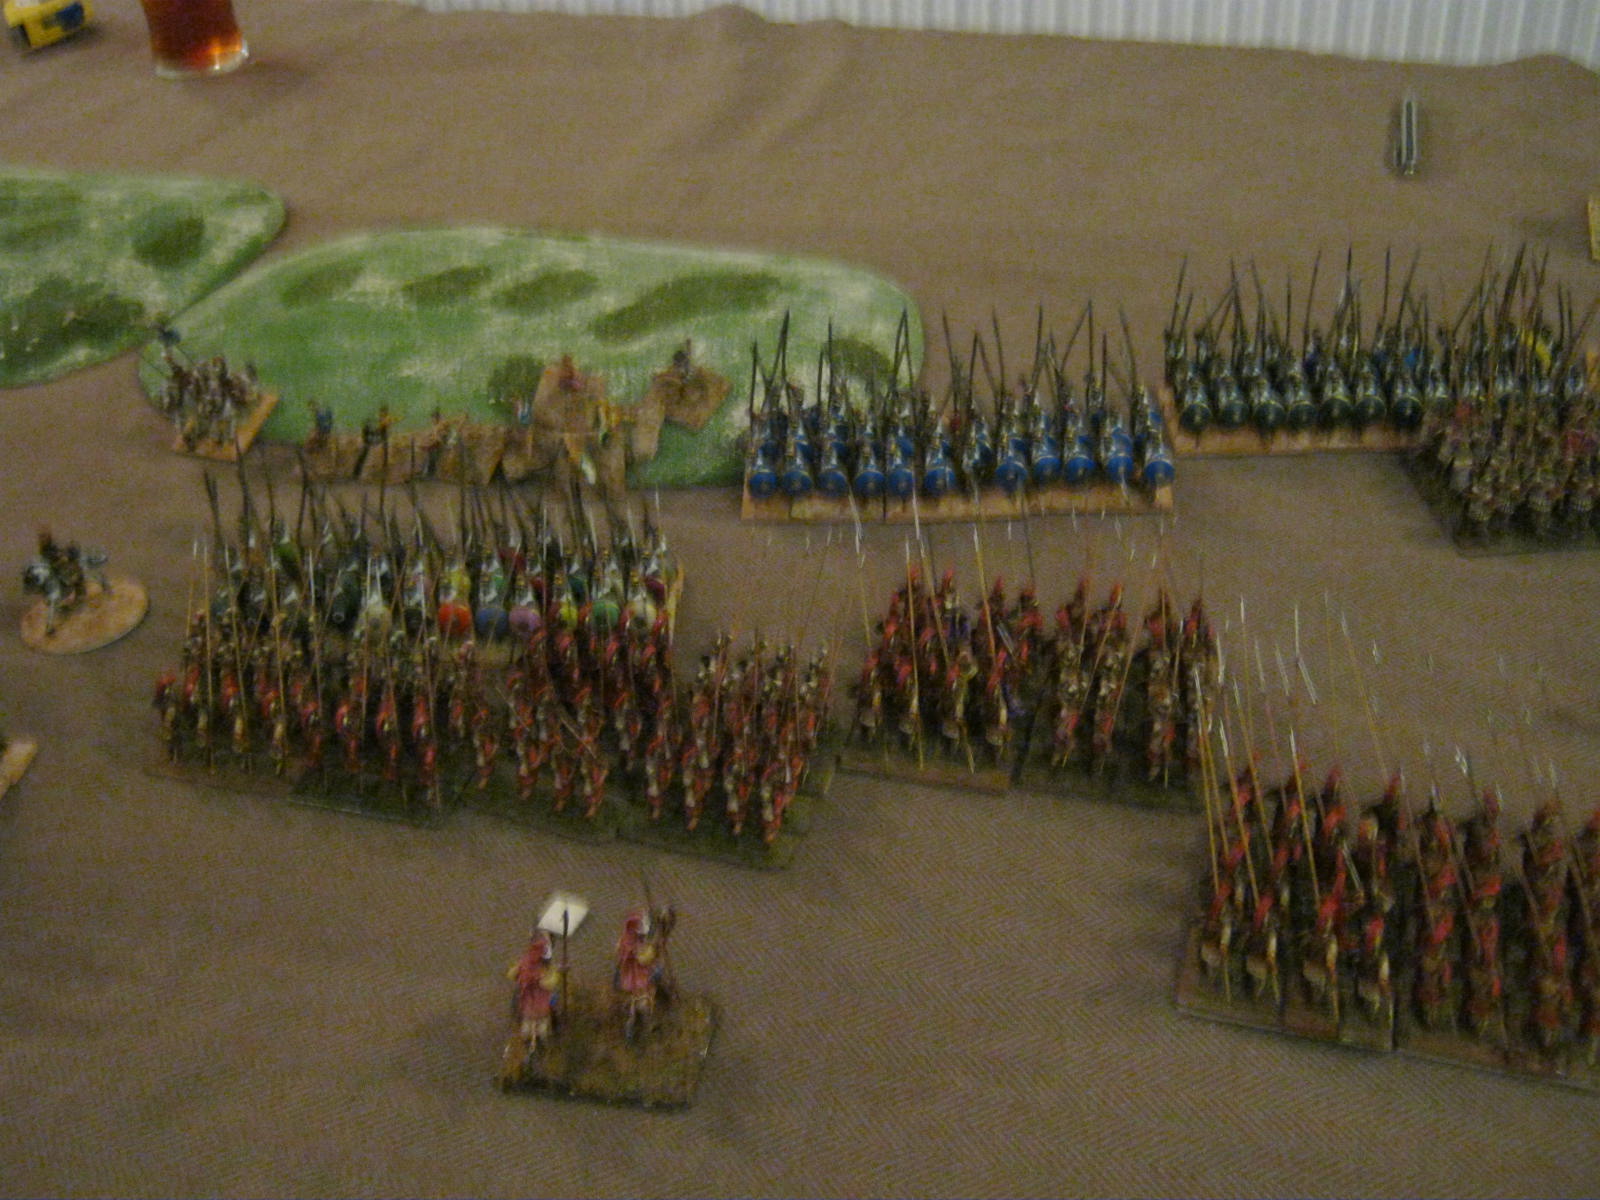
Gordon sets up the Roman army.  The first photo (above) shows their right: some Cretan archers about to move into an area of rough ground, then a combined unit of Triarii drawn from the two Latin legions, and then one of the Latin legions.  We decided that Scipio should be able to vary the standard Roman consular set up.  Gordon chooses to put the Latin Triarii together and place them outside the normal legionary deployment. This spreads the Roman force more widely than usual and makes efficient use of the Triarii.  The potential downside is that it weakens the Latin legions by removing the supporting third line.
The second photo shows the Roman infantry centre, commanded stoically by Mark: two Roman legions in triplex acies to crash through anything they hit, and then the second Latin legion.  Plenty of Velites out front.  Scipio deploys all of the Roman cavalry on their left (to the right of the shot above as you look at it), William commanding, with some slingers to help.  The initial photo of that part of the field didn't come out well, but later pictures are a bit better.

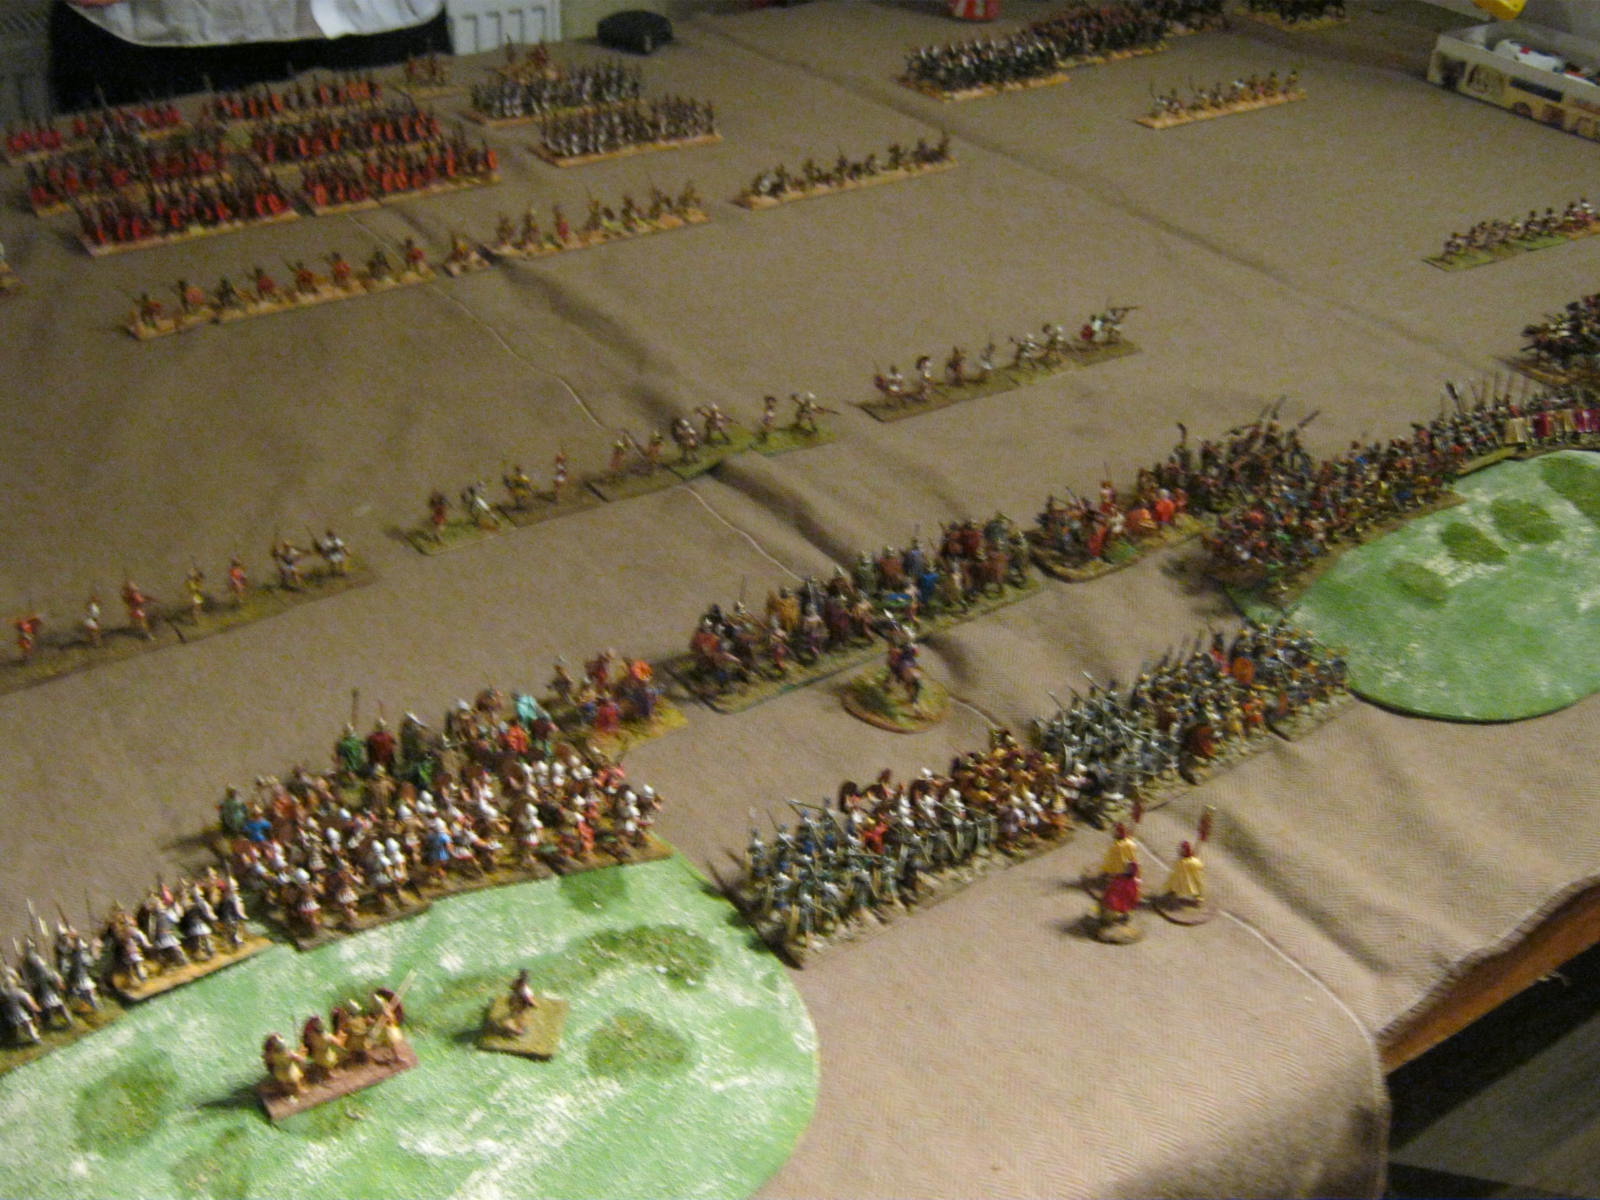
I deploy the Carthaginians and then leave them for the guys from Ayrshire to play.  Alan takes a small cavalry command on the left.  Colin takes the central infantry mass:
Lots of skirmish javelins are followed by a wave of expendable Gauls.  Behind them come the Scutarii, deployed in an area of rolling hills.  To either side of the Scutarii are Hannibal's elite spearmen, deployed wide.  This array is entirely symmetrical.
The photo above shows the Carthaginian cavalry wing, on the open right of the army, with a load of Balearic slingers out front.  By chance, both armies are equally weighted here, with Carthage having some skirmish superiority.
The photo above is a long angled shot of the entire field as the action begins, taken from the rough ground area facing the Carthaginian left.
First blood to Carthage (above) as their skirmish superiority begins to tell on their right wing.  You can see the Roman horse at the top of the photo.
At the other end of the field, the combined Latin Triarii (left as you look at it) advance wide to hold off the enemy cavalry here.
In the centre, the Gauls crash into the advancing Hastati.
Back on the Carthaginian right, their Balearics have wiped out their opposing counterparts.
An angled shot of the majority of the field.  At the very top of the photo, you can see the Roman cavalry starting to advance rather than wait to be shot up by the enemy slingers.  At the right of the picture, the Scutarii and elite spearmen wait to see the outcome of the mad Gallic charge.
The massed advance of the Roman cavalry has caught the Balearic slingers by surprise, dispersing half the unit.  Contact is imminent here and the result will be in the hands of the gods.
A closer photo of the continuing combat in the centre.  The Gauls are beginning to crumble.
Back at the Roman right/Carthaginian left, the Latin Triarii continue to press forward.  Scipio sends some Velites to the right to help the archers here.
On the other side of the field, an enormous cavalry melee takes place.  The forces here are extremely evenly matched, give or take a few skirmish hits so nobody knows what will happen, especially the Carthaginian commander (Billy).
Luck is with Billy as one of his heavy cavalry units breaks through.
On the other wing, the Latin Triarii continue their remorseless advance.  However, they are going to be unable to pin down both Carthaginian cavalry units here, and one of them is already threatening to slip past the extreme right of the Roman flank.
In the centre, the Gauls have been removed and the next wave is imminent.
However, on the Carthaginian right luck deserts the Roman cavalry and now two Carthaginian units have broken through, although the one slightly further back is almost completely exhausted.
Back to the Carthaginian left, as the extra unit of cavalry moves wide in a flanking manoeuvre.
An enormous infantry struggle develops in the centre.
Above is a close-up of the right of the Carthaginian infantry line. Latin Hastati have managed an overlap on the Scutarii.  However, at the top right you can see the elite spearmen moving towards the Latin Principes.
But at the left of the Carthaginian line, some Scutarii break through the other Latin legion.
Things are not looking good the attackers here as a classic Carthaginian flanking assault takes shape.
At the top right of the photo above you can see the elite spears crashing into Latin Principes, threatening to turn this into a double envelopment.  Or will the Romans burst through the centre in time?
Some local success in the middle as the Roman legions crush the Scutarii in front of them, but it is too little too late as the Latin Hastati and Principes are wiped out at both ends of the line.  The flanking cavalry attack works on the left, and Billy manages to turn his unexpected success on the right into a cavalry assault into the centre.

Hannibal holds the line, then.  But only just.  Both sides are busy building up for the next showdown, the Romans with their massive manpower advantage and Carthage with loads of money...


Saturday 17 November 2012

Garrison Figures Hoplites Completed

...and I am so pleased.  I have just finished units 6-10 of my Garrison hoplites.  Here's a shot of one of them:

This gives me ten units each of 36 figures.  Originally, I bought a load of these for next to nothing at Wappinshaw in Glasgow, probably about four years ago now.  They are sufficiently different from my other hoplites to stand out on the table.  I've painted them with a sort of archaic look, ie lots of bronze and no shield designs.  That way they can take the part of less wealthy troops using older equipment.  If I want to use them en masse, they work well as the opposition in a hoplite clash.  I used some at Claymore for the Thebans.

I must admit that they became a bit of a chore to paint, not because there's anything wrong with them, but because of what I call 'uniform burn-out syndrome'.  In other words, a batch of 180 similar figures in 25/28mm can become a bit wearing to produce after a while.  The same sort of thing happened with my Republican Romans and I got through those because I had promised to get them ready for a big game (peer pressure always helps).  In the case of these hoplites, I forced myself to finish them off before beginning a load of unpainted Companion Miniatures ancients that I am now buying from one of the local gamers.  Sometimes sheer bloody-mindedness works too!  I've already promised any I don't use to some of the guys from The Miniatures Page website.

I have already started on some Spanish command, and I must say that they are a real joy to paint, especially after loads of hoplites.  They are very clean, the detail is crisp, and the faces are especially well done.  The only problem I'm having is that the packs are not always what they should be.  Some didn't have standards or shields, and one pack labelled as Spanish Command turned out to be Caesarean Romans with cloaks.  This means that I'll need to work my way through them before I can be sure what is what, and then decide which ones I won't be needing.

There are two good things about the hoplites, though.  One is that they're finally finished.  The other is that my total of figures completed in 2012 has now suddenly jumped to 455.  Onwards and upwards, as they say...

Sunday 11 November 2012

Yet another Successor Battle

We played this one in the the third week of October, but this is the first chance I've had to sit down and put together a report.  The Macedonians attack Ptolemy's forces in Syria.  All photos are taken from behind the Macedonian army:
First up are photos of the relative army deployments.  The one above shows the Ptolemaic right wing, a powerful force of light horse, medium horse and elite lancers.
Photo numbers two has their right centre, three decent units of Macedonian phalangites.
Next comes their right centre, an equal number of lower quality Egyptian pikemen.
Finally, we have their left wing, a mixture of medium horse, light infantry and smaller elephants resting on the shoreline of the Mediterranean (represented by a strip of impassable river).  Gordon deployed their army.
I constructed the Macedonian army, and rolled randomly for deployment: a right wing echelon attack.  The first shot shows our left, which is to be refused: light cavalry, Thureophoroi, and the Foot Companions to protect the extreme end of the central phalanxes.  Skirmishers out front as usual.
Moving along into our centre you can see some of the phalanxes.
Our best cavalry is lined up against the seashore, supported by light infantry.  The right wing attack will mean that we will be skirting the hills in the enemy's centre; fortuitously, we will also be avoiding their best phalanx units.
The enemy pours forward against our weak left, taking some nasty hits from our skirimishers.
Their phalanxes occupy the low ridge in the centre.
Their low quality phalanxes, however, are a bit apprehensive, and one unit hands back with their left wing units.
Our army begins its advance en echelon.
Above is an angled shot of the centres a little later.
The same moment, a bit more to our right.
The situation develops on our right wing.
I delay the inevitable for as long as I can on my left, buying as much time as possible for my skirmishers to affect the advancing enemy.  At the top of the photo you can see that Gordon has angled one phalanx and his lancers into the centre.
A closer shot of the developing threat to my phalanxes.  Gordon will have two units capable of moving into the centre.
A large crunch on my left.  despite the enemy's weight here, I have a slight advantage due to shooting hits on the large unit of enemy medium cavalry.
Towards my right, the phalanxes are coming to grips.  It all hangs on whether I can win here before the enemy rolls up the left of my phalanxes.  The Foot Companions are going to have to sell themselves dearly.
The shape of the field to my right.
Back to my left, where things are looking good.  The enemy medium horse have been destroyed.
As expected, the enemy lancers swing in towards the flank of my Foot Companions.  They have the best morale in the army, and they're going to need it...
Instead, they go squish.
A gratuitous shot of my victorious light cavalry.  Some of the enemy phalanxes have had to wheel away from the main action to protect their own flanks from my marauding scumbags.
But all is in vain as my Guards fail miserably and the enemy lancers thunder into the rear of my phalanxes.

Oh, well, another Successor mess comes to an end.  We roll for the next campaign events, and in a series of moves Scipio presses Hannibal backwards through Liguria, Transalpine Gaul and on into Spain.  Here Hannibal has gathered enough force to make a stand, so the next battle will be quite a large one in Iberia proper.  Should be a good multiplayer fight.