Friday 31 December 2010

Magnesia: A Game of Two Halves (Part 1)

I think this should cover the way the first half of the game went, at least up to the point at which most troops were engaged:
A long view of pretty much the whole table as the battle begins; taken from the extreme right wing of the Roman army.  In the foreground, the scythed chariots are advancing on the Pergamene cavalry.  The Seleucid cavalry on this flank elects to stay put, hoping that any scythed chariots that rout back will not disrupt their own formation.  Stretching off into the distance you can see the Roman infantry advancing.
A shot from directly behind the scythed chariots.  I printed out details of the various commands and placed them behind the figures before the battle; I wasn't sure how many players we'd get, and whether or not they would all be familiar with the rules.
The Romans are coming!  The photo above is taken from behind the Seleucid left centre.
A shot of the phalanxes from the same position.  The elephants have dropped back somewhat to make it more difficult for the Velites to shoot them up before they get into combat.  In the far distance at the top right of the picture you can just about make out the massed Seleucid cavalry advancing.
The same position, a turn later.
Back on the Seleucid left, the charge of the chariots has broken up.  One of the five has made it through.  The two end units are already in rout due to shooting hits, and two others are stalled in disorder.

A side-on view on the central lines, taken from roughly the whereabouts of the chariots.  The infantry are about to meet.
The same point, from a slightly different perspective.  In the distance, the Seleucid right wing cavalry are going in.
A close-up of the leftmost phalanx in action against the Hastati.  The accompanying Galatians have held off a bit, at least until the pila are discharged.
One chariot remains.  The whole lot has broken by now, except for this one.  Its momentum gone, the Pergamenes charge it with their cavalry anyway, showing the chariots the contempt they deserve.

The Seleucid left wing cavalry begins to advance, now that the chariots are all but destroyed.
The action is now general across the rest of the field.

Thursday 30 December 2010

Magnesia: Deployment Plan

This is the map I initially came up with for the Magnesia scenario.  At the top in blue are the Seleucids.  Their extreme right wing facing the river loop is covered by Dahae skirmishing horse archers and some camelry.  Next to them are the Agema and a load of Cataphracts.  Then it's some Galatian foot and the Argyraspides.  The centre is a huge, deep phalanx interspersed with some elephants, with more Galatian infantry at their extreme left.  The left flank has Hillmen Light Infantry linking the main infantry centre with the cavalry on the wing: more Cataphracts, a load of Galatian horse, and some lights at the extreme end.  In front of this wing are the scythed chariots.  Skirmish infantry screen the centre.

The Romans have their usual four legions, with the left flank resting on the river.  Then it's the Pergamenes: excellent quality Achaeans; elite lancers; heavy cavalry and then some good quality light horse at the extreme flank.  This wing is held back to give the skirmishers up front a chance to deal with the scythed chariots.

Magnesia: Dramatis Personae (Romans)

Eumenes (figure by Essex) behind the cavalry on the right wing of the Roman army.  I used my Roman cavalry to represent standard heavies, as opposed to the Pergamene lancers (which are out of shot to the left).  The unit you can see on the left of the photo are old Minifigs Later Romans that were converted years ago by Gordon.  The central unit is my newly painted 1st Corps Republican Roman cavalry.  Off to the right you can see my old Essex Tarantines, doing duty as Pergamene light horse.  To the front left you can just about make out some Trallian slingers, deployed by Eumenes well in advance so as to take care of the Seleucid scythed chariots.
Legatus of the Dexter Latin legio in the midst of his command.
The Sinister Latin Legio with command base in the central foreground.
To give some variation, I used my circular bases of mounted command figures to represent the higher echelons.  This means that if there are enough players for the game, we could have not only commanders for the individual legions, but a general with oversight of a pair of legions.  This particular base represents Scipio Africanus, present at Magnesia to help out his younger brother.  Strangely enough, Hannibal was also at Magnesia, as a subsidiary adviser to Antiochus!
A Roman legionary commander, this time.  I painted my Romans with a lot of red; the Latins are in white.  This helps to differentiate them on the field.  I know that, technically, the lictor should have a red tunic as well, but I'm pretty sure that is the case for the lictors accompanying the Censor back in Rome.  I've used artistic license for the lictor of a legatus in the field - it's less boring after all those red tunics.

The Roman commanders were, in order from the left of their set up:

Sinister Latin Legio: Billy
Sinister Roman Legio: Michael
Dexter Roman Legio: Mark
Dexter Latin Legio: Dougie, in his first game
Eumenes: Simon

Wednesday 29 December 2010

Magnesia: Dramatis Personae (Seleucids)

Here we have Antiochus "The Great" (played by Willie) parading safely in front of his cataphracts.  At the right of the picture you can see some Galatians, trying to pretend they are as fierce as their ancestors so long as Antiochus is looking.
Philip (Ian Kerr) leads the Argyraspides, supposed cream of the infantry.  They're really just a shadow of their glorious predecessors, but they are still of better quality than the deep mass of tremblers to the right of the photo.
And leading the first batch of trembling phalangites, above, we have Mendis, played by Dave in his first battle.  Antiochus has drawn up the phalanx even more deeply than usual, because he doesn't trust them against the legions.  Note the interspersed elephants, another attempt to shore up the infantry against the expected onslaught.
The second phalanx commander, Zeuxis (another Ian!).  The phalanx is so deep that they won't all be able to fight.  Antiochus expects this won't be a problem, because the Romans will crush the first few ranks anyway.  Slingers are out front.
Antiochus' nephew Seleucus leads the Cataphracts that are just to the left of the photo above.  I started playing them, and then Ewen took over.  The guys you can see in the centre are Galatian horse with some flanking lights off to the right of the photo.  In front are the expendable scythed chariots.  They are in exactly the right position to rout back into all those cavalry.  The general figure at the very top is Antipater (Gus), lurking as far out of the way as he possibly can.  Maybe he isn't too pleased with the deployment devised by Antiochus.

Magnesia: Deployment

Long distance shot looking from the Seleucid central area across the front of the legions towards Eumenes at the top left of the picture.  The Pergamene cavalry are deployed well behind their skirmishers.
The photo above is taken from behind the Roman centre, looking towards the Seleucid left flank at the top right of the picture  (which faces the Pergamenes from the first photo).  You can see the powerful cavalry forces on the Seleucid wing, behind the scythed chariots.  At the top centre of the picture are the light infantry hillmen, linking with some Galatians and then into the massed phalanx at the top left of the photograph.  Evil nasty Roman legionaries are in the foreground, growling grimly at all and sundry, especially their generals: "We want loot! We want loot!  We want loot!  And some slaves wouldn't go amiss either.  Did we mention loot?"  And some people think these guys were civilised...
Shot number three is taken from the same position as the one above, but this time looking towards the Seleucid right flank.  In the immediate foreground is the mass of the legionaries, flank resting on a loop of river.  The Velites are out front to do what they do best.
A view above of those nice neat legionaries, taken from the left hand corner of the Seleucid deployment.  You can't see much detail in this one, but I think it gives a good impression of the massed legions.  Pergamene skirmishers are in the immediate foreground and you can make out the Achaean auxiliaries linking the legions with the Pergamene cavalry to the left of the shot.

Magnesia Photos

Thanks are due to Michael for some fast work organising a selection of photos from yesterday's mammoth game:

http://www.flickr.com/photos/46755253@N00/

I'm going to wade through my own pictures to pick out the best ones.  I'll then use them to illustrate a narrative of the battle as it played out, in my usual style.  The photos won't be as good as Michael's though.  Full report to follow when I get my act together...

Sunday 26 December 2010

Snow stops play

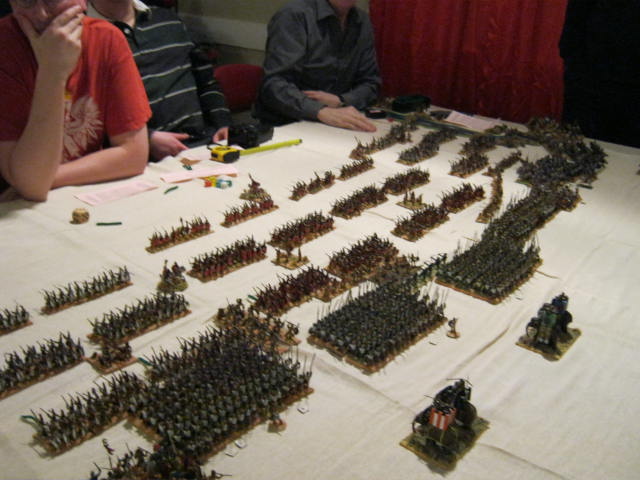
I should have written this up over a week ago, but this time of the year can become rather busy.  Anyway, we played out a Roman attack on Carthaginian-held Sicily.  The Romans were about to win, but we ran out of time.  The reason is that it took us an extra 45 minutes to get to the club in the first place, because all traffic in and around Glasgow city centre was at a virtual standstill due to the weather.  Here's the deployment map.  Carthage in blue at the top of the map, Romans in red:
Terrain is minimal - a low hill at the front left edge of the Roman infantry deployment zone and a large piece of rough on the Carthaginian left flank.  William constructs and deploys the Carthaginians and I do the same for Rome.  The Carthaginian right flank has a lot of cavalry with some elephants.  Their centre is composed of Italians and Hoplites, and is mostly held back.  Their left is a less powerful but more manoeuvreable mixture of cavalry and elephants, with some more Italian foot to help out.  William guesses my deployment almost exactly right: all the cavalry on the open left, then a couple of small units of Italians, then the legions and, held back as far as possible, more Italians.  Both armies have the usual mix of skirmishers out front.

William's guess doesn't quite account for two things.  First, the two units of Italian foot to our left will come in handy for us.  More importantly, he wants to run the Carthaginian right wing cavalry himself, which means he is having to rely on others (Simon and Marco) to lead the left flank attack.  Billy runs their infantry centre.  I take the Roman left and left centre, and Gordon takes the rest of the Romans.  Photographs are mostly taken from the Roman left flank, because that's where I am.
A large gap between the central infantry lines.
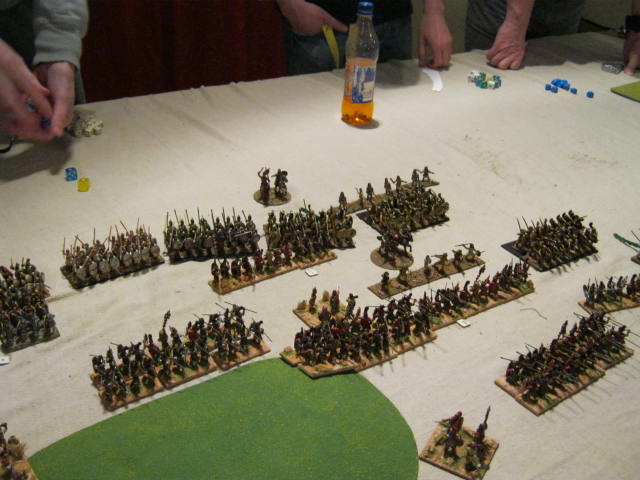
The cavalry closes and the Italian
 infantry advances over the hill.
A mass of horse thunders towards the open space on the Roman right; the Italian infantry angles to face them.
On our left, the Italians keep going and the legions come up on their right in support.
The same moment, into the centre.  The Roman army is leading with its left while the Carthaginians are trying a double envelopment.
The infantry starts to clash - in the meantime, the cavalry on the Roman left and Carthaginian right are busy hammering each other into oblivion.  A cavalry stalemate is acceptable on this flank to both sides.
The infantry centres get closer.
On our extreme right, the Italian infantry marches forward to kill as many enemies as possible before meeting their own demise.  Some Numidians make it behind the lines, only to be met by a hail of missile fire.  The Carthaginian general looks over at this point from his desperate struggle against the Roman cavalry.  Various helpful mutterings are heard from his aides about collecting nails for the sub-generals on their left.  Losing Carthaginian generals were supposedly often crucified by their own people!
The Romans start to grind the enemy centre with meticulous and merciless precision.  The Carthaginians really need that flanking force to get a move on!
More of the same.  The Hastati are especially effective in this game.
The far Carthaginian flankers are beginning to make a concerted appearance; note the gap behind the Italian infantry.  They are very much on their own, but Gordon calculates (correctly) that it will still take the enemy a while to get into the centre.
The Italians on our left destroy the elephant, which routs into the other Italians, disordering them.  The Italians fighting for Carthage are also disordered on morale!  All of the Carthaginian infantry are beginning to look rather ill by this point.
The Principes line up for the coup de grace.
Finally, the Carthaginian cavalry gets behind the Roman lines on our far right.  Here they are about to charge the rightmost Latin legion. 
And then we run out of time.  The Latin legion on the right is routed by the Carthaginian heavy cavalry ("About time too" says William), but they are too far away from anyone else to do any more damage.  If we had another turn, the entire Carthaginian centre would have been wiped out to a man and the Romans would have won.

No campaign games for a while, but we are hoping to have a large multiplayer game of Magnesia.  Assuming the weather doesn't get us again, that is.

Sunday 5 December 2010

Another Roman Command Base

This is the second of two cavalry generals' bases for my Republican Romans:
I've taken angled overhead shots this time so that you can see how the basing looks.

Ultimately I will have a load of cavalry, half in mostly red with red shields and half with more white on them.  These guys give me the command base for the second lot; I already have the red commanders.
Figures are by 1st Corps.  Shield transfer is by Little Big Men, from a recent release for Aventine commanders.  They don't do transfers for 1st Corps cavalry, but I find that those for Aventine fit well enough.

Very Large Sabot Bases

There is talk of the next big club game being Magnesia.  I already have most of the figures for this, and others can also contribute.  The one thing that is missing, though, is the Seleucid contingent of ten scythed chariot models.  I have four old Essex ones that are fine, but there isn't the time for me to buy and paint another half a dozen.  Also, I'm loath to do so because this would be expensive, and I can't think of any other occasion I'd ever field that many.  So I made some large sabot bases:
Thet are 12cm wide by 8cm deep.  This is the frontage of two chariot models, and is the correct depth.  The idea is that a chariot (or elephant for other games) can sit in the middle and do double duty.
Above is an angled shot.  I just glued on some old bit of board to try to keep the channels smooth and larded on my usual basing mix.  The result looks like this:
And this:

They aren't perfect, and you can still see the joins, but they'll do nicely enough at tabletop distance.  If I can be bothered, I'll disguise the joins on the day with some extra flock.

Thursday 2 December 2010

On the Painting Tray: December 2010

Last month, I fully renovated and rebased 64 old Lamming Italian Infantry.  This month, the plan is twofold.  First, to paint from scratch a couple of command figures and a dozen cavalry for my Republican Romans (1st Corps).  Second, a money-saver.  It looks as though the club's annual big game will be Magnesia.  I will need 10 scythed chariots for that in total, and I already have 4 old Essex ones from my Pontic army.  It seems a bit of a waste of money to buy another 6.  I can't think of another occasion I'd need that many, so I'm going to economise by making 5 large sabot bases.  Scythed chariots (or elephants for other games) could just slot into these.  This means I'd only need to borrow one chariot for Magnesia, and I'm pretty sure that Simon or Willie would have one that's useable.  If I manage to complete anything else in addition, that will be a bonus.