


.JPG)


.jpg)


.JPG)

Ilipa, 206 BCE

Carthaginians - blue (Hasdrubal Barca)
Right Wing (Mago Barca)
- One unit of 2 Elephants (Veteran)
- One unit of 12 Veteran Spanish Medium Cavalry with spears
- One unit of 12 Elite Punic Heavy Cavalry with spears
Four units of 45 Mlitia Grade Celtiberians in loose formation, deployed in five ranks
Centre (Hamilcar Cisgo)
Four units of 36 Elite African Heavy Infantry with spears, deployed in three ranks
Centre Left (unnamed Turdetani Celtiberian Leader)
Four units of 45 Militia Grade Celtiberians in loose formation, deployed in five ranks
Left Wing (Masinissa)
- One unit of 2 Elephants (veteran)
- Two units of 16 Veteran Numidian light cavalry, deployed in four ranks
Left Wing (Lucius Marcius Septimus)
- Two units of 8 Veteran Velites
- One unit of 18 Veteran Italian Medium Cavalry with spears
Two legions, each comprising:
- One unit of 24 Veteran Hastati Heavy Infantry with pila
- One unit of 24 Veteran Principes Heavy Infantry with pila
- One unit of 12 Elite Triarii Heavy Infantry with spear, deployed in three ranks
Four units of 48 Veteran Spanish Medium Infantry with pila, deployed in four ranks
Right Centre (Scipio in person)
Two legions, each comprising:
- One unit of 24 Veteran Hastati Heavy Infantry with pila
- One unit of 24 Veteran Principes Heavy Infantry with pila
- One unit of 12 Elite Triarii Heavy Infantry with spear, deployed in three ranks
- Two units of 8 Veteran Velites
- One unit of 12 Veteran Roman Medium Cavalry with spears
- One unit of 12 Veteran Spanish Medium Cavalry with spears
The Elephants
Elephants receive javelin fire from the Velites at double effect. A unit of elephants routs at five hits, being completely destroyed at seven. In order to simulate the disruption they caused on the day, roll for rout direction on 1D6. 1-2: Left. 3-4: Back. 5-6: Right. Any immediately affected troops take morale tests. Then apply the following rules:
- If the elephants routed with seven or more hits, remove the unit entirely. It has dispersed as an effective force, possibly including being finished off by the mahouts.
- If the unit took six hits, apply an extended rout distance of 8” instead of the normal 4. Any extra units within the extended distance must take morale tests. Then remove the unit as in the first point above.
- If the unit only took five hits, this is enough to cause rout, but they are still a formidable obstacle capable of causing damage. Apply the criteria for the second point above, but leave the figures on the board. Just before the first movement phase in the following game turn, apply the second point above in the same direction for another 8”, then remove the unit.
These did not perform at all well on the day, so I have given them the lowest morale grade. They count as loose order medium foot. This means that they will be lacking the impetuous charge one normally associated with the Celtiberians. There are two reasons for this: they are reluctant allies at best; and by the time the battle begins they are very, very hungry.
Cavalry
I have deliberately downscaled this scenario because the huge numbers of infantry would require a massive table, and I don't know anyone who would have those numbers of Celtiberians in particular. But this means that I have had to fudge the cavalry units in order to represent them reasonably well. There are in fact too many of them in proportion to the infantry, but the 12-figure medium and heavy cavalry units are the smallest permissible under our rules. I left them this way so that their presence is at least registered.
Carthaginian Troops
I have graded the heavy cavalry and the African spearmen as elite. The latter in particular did well extricating themselves from the disaster (helped by the weather), so I thought they deserved some recognition. Also, I needed to equalise the points with the tough Roman legionaries, so this was more of a pragmatic choice based on the parameters of the rules.
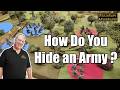
The Roman Deployment
Scipio had arrayed his forces against the enemy for the two days prior to the battle, using this as a way to study their own battle deployment. He noted that they set up their forces in the same way on both occasions, and surmised that this was going to continue to be their plan; their best troops in the centre, Celtiberians to either side of them, and elephants and cavalry to the flanks. He deployed his own army rather conventionally, with the legions in the centre and the allies on the wings. On the third day, he had his troops rise early and eat a hearty breakfast. He then marched them out, forcing the opposition to come out to match him without having had time for breakfast themselves. He then waited several hours for them to become even weaker before beginning the attack. This time, however, he had swapped the relative deployments of his Romans and Spanish troops, so that his best troops, the legions, were off-centre against the unruly (and by now starving!) Celtiberians. He refused his own centre so as to delay contact with the spearmen for as long as possible. This scenario begins after the usual initial skirmisher fight has been won by the Velites, the remainder of whom have been shifted to the flanks to counter the elephants. This is why they count as part of the wing commands. Scipio opened the battle by advancing the legions in column at great speed and then deployed into line so as to attack the Celtiberians from the outset. This is not something that can be represented easily in most rulesets, so I have set the Romans up on the edges of the concave formation. If you feel this is not enough under your rules, move them forward by an extra turn's worth of movement. The same should probably also be true for the Velites and the cavalry.
The Triarii
These are the cream of the Roman army and may make a formation change from line to column or vice versa at any time in the battle, and may do so more than once. I have kept them in column formation to begin with, so as to maintain some of the flexibility the Romans demonstrated in this battle.
Army Morale
Since this is a mainly infantry battle, I came up with a formula for army morale. The Carthaginians need to lose 8 unit points. Each of the Turdetani is worth one point and the spearmen are worth two. The Roman army also needs to lose eight points; each of the Spanish, Hastati, Principes and Triarii are worth one point. However, units from a Roman legion are not counted until that entire legion is destroyed. This is to represent the dogged tenacity of the legion.
The Table-top
Ilipa is a very large battle; the Turdetani alone may have numbered as many as 50,000. Rather than try to represent it in full, I have more or less halved the numbers with quite a bit of fudging, especially the cavalry. This means that it can be squeezed on to a standard 9' by 5' table (for 25mm figures).
Zama, 202 BCE

Right Wing (unknown commander)
- 12 Veteran Medium Cavalry with spears
- 18 Veteran Medium Cavalry with spears
- 12 Veteran Medium Cavalry with spears
- Elephants: four units of 3 Militia Grade small elephants
- First Infantry Line: two units of Mauretanians, 12 Veteran Skirmish Infantry with javelins
- First Infantry Line: two units of Balearics, 12 Veteran Skirmish Infantry with slings
- First Infantry Line: four units of Gauls/Ligurians, 24 Veteran Medium Infantry with spears
- First Infantry Line: three units of Celtiberians, 36 Veteran Warriors in four ranks
- Second Infantry Line: eight units of City Militia, 24 Militia Grade Medium Infantry with spears
- Third Infantry Line: four units of Bruttians, 24 Veteran Heavy Infantry with spears
- Third Infantry Line: four units of Hannibal's Veterans, 24 Elite Heavy Infantry with spears
Three units of 12 Numidians: Superior Elite Light Cavalry with javelins
Romans - Red
Left Wing (Laelius): Equites: two units of 18 Veteran Heavy Cavalry with spears
Centre (Scipio)
Four Legions, each comprising:- 12 Velites: Veteran Skirmish Infantry with javelins
- Two units of 24 Hastati: Veteran Heavy Infantry with pila
- Two units of 24 Principes: Veteran Heavy Infantry with pila
- Two units of 12 Triarii: Elite Heavy Infantry with spears
Five units of 16 Numidians: Veteran Light Cavalry with javelins supported by,
Five units of 8 Numidians: Veteran Skirmish Infantry with javelins
Scenario Notes
The Elephants
The game begins with the initial charge of the elephants. They must move 8” per turn and receive javelin fire from the Velites at double effect. A unit of elephants routs at six hits, being completely destroyed at eight. In order to simulate the disruption they caused on the day, partly because of their sheer numbers, an amendment is made to the normal Tactica II procedure. First of all, roll for rout direction on 1D6. 1-2: Left. 3-4: Back. 5-6: Right. Any immediately affected troops take morale tests. Then apply the following rules.
If the elephants routed with eight hits, remove the unit entirely. It has dispersed as an effective force, possibly with some elephants routing through the lanes left for them by the Romans. This is a deliberate abstraction.
If the unit took seven hits, apply an extended rout distance of 8” instead of the normal 4. Any extra units within the extended distance must take morale tests. Then remove the unit as in the first point above.
If the unit only took six hits, this is enough to cause rout, but they are still a formidable obstacle capable of causing damage. Apply the criteria for the second point above, but leave the figures on the board. Just before the first movement phase in the following game turn, apply the second point above in the same direction for another 8”, then remove the unit.
Again, note that this is an abstraction, but it should present the Carthaginians with exactly the problems that occurred on the day, unless they deliberately keep their cavalry wings and first infantry line back out of harm’s way. This is not what Hannibal did, because his intention was to follow up the elephant charge almost immediately with the first infantry wave, as happened at Bagradas. However, this plan was successfully countered by Scipio.
The Equites
The Roman cavalry are, unusually, superior to the Carthaginian heavies, albeit somewhat outnumbered (in points terms, the two are absolutely identical). This is because the Romans are Scipio’s veteran Equites, while the Carthaginians lack the experience of the infantry veterans from Italy.
Tychaeus
The Numidian horse of Tycheus that fought on the Carthaginian side are noted as being the best cavalry in North Africa, although still light cavalry. I have therefore graded them as having superior fighting value and elite morale. They are, however, well outnumbered.
Masinissa
The force of the Numidian prince included a very large number of what are vaguely described as “light infantry” who seem to have played relatively little part in the battle. I have reduced their numbers and attached them to the light cavalry units as SI, using the fire support rules suggested in an earlier playtest edition of Tactica II. I have deliberately given them javelins only, since slings or other long range missile weapons would make them too much of a threat to the Carthaginian infantry.
The Carthaginian First Line
The exact composition of Hannibal’s first infantry line is rather hazy. Gauls, Ligurians, Balearics, Iberians and Mauretanians are all mentioned, but no precise role is identified for any of them. I decided to make the infantry component a mixture of hard-charging Celtiberian warbands and Ligurian foot with a skirmish infantry component.
The Carthaginian Second Line
Hannibal’s second infantry line is composed of hastily raised Carthaginian levy spearmen. They were well armed from the city armouries, but making them heavy infantry would skew the points values for the armies.
The Carthaginian Third Line
Hannibal’s final line is composed of a mixture of elite spearmen with a history of long service and Bruttians from the latter part of the Italian campaign. The four Bruttian units make up the centre of the line, with two units of Italian Veterans at either end. These four may take a wheel of up to 4” at no extra cost instead of the usual 2”, to reflect their superior drill, training and experience.
The Roman Legions
The deployment in column of the Roman legions is depicted from the outset; they may move and then change formation into line, even with enemy within 8”. These are Scipio’s veteran legions and their drill capabilities are well attested from Ilipa and other battles. I have made no difference between the Roman and Socii Legions, assuming that the Scipio's army consists of a standard proconsular arrangement of two Roman and two Socii legions with a good quality cavalry contingent (plus Masinissa's troops).
The Triarii
These are the cream of the Roman army and may make a formation change from line to column or vice versa at any time in the battle, and may do so more than once.
Unit and Army Morale
To reflect the tenacity of the infantry contingents of both armies, no infantry unit on either side tests morale unless it sees a unit from the third line break. Unless affected by elephants, of course. This was a fight to the bitter end, so either army breaks only when it loses half of its final infantry line.
The Table-top
The map is scaled at 9’ by 6’ for 25mm figures, to reflect the relatively short but deep deployments of the two armies. Adjust accordingly if you are using a different scale.
The Rules
The rules we use are Tactica II, but I have written this scenario in as generic a manner as possible. The proportions of the various Carthaginian infantry lines have been somewhat distorted to make the battle fit the rules. If you don't like it, then change it. For example, reduce the numbers of Ligurians and Celtiberians and make the Militia more numerous and/or effective. As it stands, with the elephants removed, the Carthaginian army is only slightly stronger than the Romans. This should be compensated by the danger of routing elephants to their own side.
Commands
The game has been deliberately set up so that the cavalry wings face each other directly, and so that each Roman legion can fight against exactly lined up enemy units. There could easily be as many as six players per side.
Historical Constraints and Other Possibilities.
The battle begins with the initial charge of the elephants. To replay the battle, the Carthaginian cavalry on both wings must advance at the same speed as the elephants, the intention being for the whole mounted arm to charge home at the same time. On the day, of course, this plan was disrupted by Scipio's anti-elephant tactics. The first and second infantry lines should advance at full speed, again allowing for a replay of the confusion caused by the elephants. The final infantry line should hold back somewhat at the rear. To refight the battle as a game with more possibilities, as opposed to a simple replay, permit the Carthaginian troops free movement, apart from the elephants. This should allow several interesting options. For example, the Carthaginian cavalry can hang back or even retire, postponing the fight on the wings for quite a while. Hannibal's first and second infantry lines could also slow down, waiting for the elephants to be committed and to be less of a threat to themselves in the eventuality of defeat. Finally, the veteran third line could advance more speedily than was the case historically. The most radical option, of course, would be free deployment.
Seleucids - Blue
Right Wing (Antiochus)
- 24 Dahae Veteran Skirmish Light Cavalry with bows
- 12 Veteran Camels
- 18 Agema Elite Heavy Cavalry with lance (3 ranks)
- Two units of 18 Veteran Cataphracts (3 ranks)
Centre (Philip)
- 3 units of Veteran Skirmish Infantry with javelins
- 1 unit of 12 Veteran Skirmish Infantry with bows
- 1 unit of 12 Veteran Skirmish Infantry with slings
- 32 Galatian Veteran Warriors in close formation (4 ranks)
- Two units of 48 Argyraspides Elite Pikemen (4 ranks)
- Six units of 48 Veteran Phalangites (6 ranks)
- Two units each of two Veteran Indian Elephants
- 32 Galatian Veteran Warriors in close formation (4 ranks)
- Two units of 18 Veteran Light Infantry with javelins (3 ranks)
- Two units of 18 Veteran Cataphracts (3 ranks)
- Three units of 18 Galatian Veteran Medium Cavalry with spears (3 ranks)
- 8 Veteran Light Cavalry with javelins
- Five units, each of 2 Militia Grade Scythed Chariots
Legions (Scipio Brothers)
Four Legions, each comprising: - 12 Velites: Veteran Skirmish Infantry with javelins
- Two units of 24 Hastati: Veteran Heavy Infantry with pila
- Two units of 24 Principes: Veteran Heavy Infantry with pila
- Two units of 12 Triarii: Elite Heavy Infantry with spears
- Two units of 12 Achaeans: Superior Light Infantry with javelins
- Two units of 12 Elite Heavy Cavalry with Lance
- Three units of 12 Veteran Heavy Cavalry with spears
- 12 Veteran Light Cavalry with javelins
- 12 Trallian Slingers: Veteran Skirmish Infantry
- 12 Cretan Archers: Veteran Skirmish Infantry
The Seleucid Army
This is a very large army, with many units deployed deep. I have interspersed the elephant units in between the phalanxes in order to make them as dangerous to their own side as seems to have been the case. Tactica II usually denotes army breakpoint by number of massed figures destroyed, but this would be too difficult to track. So I recommend a break point of half of the massed non-light units, i.e. all of the heavy infantry, cavalry, and elephants, which comes to a total of 21 units, including the camels. Army breakpoint is therefore 11 of these units.
The Scythed Chariots
Representing these adequately is a real challenge for any ruleset, exacerbated by the damage they did in this battle to their own side. The game begins with the initial charge of the chariots. They must move 12” per turn and receive fire from enemy skirmish and light infantry at double effect. A unit of chariots routs at six hits, being completely destroyed at eight. In order to simulate the disruption they caused on the day, partly because of their sheer numbers, an amendment is made to the normal Tactica II procedure. First of all, any friendly troops within 4" are automatically disordered. Then apply the following rules.
If the chariots routed with eight hits, remove the unit entirely. If the unit took seven hits, apply an extended rout distance of 12” instead of the normal 4. Any extra units within the extended distance must take morale tests. Then remove the unit. If the unit only took six hits, this is enough to cause rout, but they are still a formidable obstacle capable of causing damage. Apply the criteria for the second point above, but move the unit back 12" and leave the figures on the board. Just before the first movement phase in the following game turn, apply the second point above in the same direction for another 12”, then remove the unit. These rules are a deliberate abstraction, but should present Eumenes with exactly the opportunity that occurred on the day. Because most rulesets make scythed chariots move relatively quickly, I have hung the Pergamene wing back to give their missiles more time to take effect.
Cataphracts
In Tactica II, a disordered unit simply has to do nothing for a full turn and is then automatically returned to full order. However, Cataphracts rely on keeping formation, and were notoriously hard to re-order if something went wrong, as indeed happened here. To simulate this, instead of allowing Cataphracts to re-order automatically at the first opportuniy, they must test to do so. If this fails, and they receive enough time, they automatically regain full order after the next turn. Historically, Eumenes was able to use his skirmishers to rout the scythed chariots back into the Cataphracts behind them. His heavy cavalry then charged the disordered colums and swept them from the field.
The Seleucid Infantry
I have gone for a reasonably traditional interpretation of how the Seleucid infantry was deployed. The Argyraspides occupy the position of honour on the right, with the rest of the phalangites in the centre. The Galatians are set up next to the two wing commands.
The Roman Army
The Romans break when they lose two legions; their infantry does not test morale unless they see Triarii rout. The Roman infantry counts all of its intact lines as denying enemy depth, although of course this will degrade as the lines are destroyed.
The Roman Deployment
Instead of trying to simulate the confusion that struck the leftmost legion, I have set up the battle with the legions all in line. The leftmost legion will have a bad time initially against the powerful cavalry facing them anyway, probably being forced back onto their Triarii before coming through.
The Tabletop
This game is scaled at 11 feet wide by 6 feet deep for 25mm figures. The Dahae and Camels on the Seleucid extreme right should hardly come into the game because of the impassable river bend. Scale down appropriately for other figure scales.
Commands
The Romans could easily have four players commanding the legions, plus Eumenes. The Seleucids could have two wing commanders, plus at least two in charge of the infantry centre.
Historical Constraints and other possibilities
In a straight replay, the Seleucids should advance all along the front. Their right wing cavalry punch should cause a great deal of damage before petering out. In the centre, there should be a grinding match until the elephants give way, probably causing disorder among the phalanxes. On the left, the scythed chariots should rout back into the main cavalry force, disrupting it and allowing Eumenes to launch his famous charge. For a refight, use the deployment as given, but permit both sides to move troops as they wish. An interesting variation would see two Seleucid options. Firstly, permit the central elephant units between the phalanxes to hold back until the pike blocks have ground their way through the Hastati and into the Principes. Get the pikemen to take all of the pilum hits, and then throw the elephants in to try to break through to the Triarii. Secondly, of course, throw the left wing chariots as far forward as possible to die before moving the cavalry behind them; this lessens the chance of severe disorder and gives the cavalry a decent fighting chance against Eumenes.
Right Wing Command (Scipio)
- Pontics: 18 Veteran Light Cavalry with javelins in three ranks
- Two units of 10 Caetrati: Veteran Skirmish Infantry with javelins
- Legion of Spanish/Evocati: 9 Cohorts of 8 Veteran Heavy Infantry in three lines each of three Cohorts
- Cilician Legion: 9 Cohorts of 8 Veteran Heavy Infantry in three lines each of three Cohorts
- 1st Syrian Legion: 3 units of 24 Militia Grade Heavy Infantry in three ranks
- 2nd Syrian Legion: 3 units of 24 Militia Grade Heavy Infantry in three ranks
- I Legion: 9 Cohorts of 8 Militia Grade Heavy Infantry in three lines each of three Cohorts
- III Legion: 9 Cohorts of 8 Militia Grade Heavy Infantry in three lines each of three Cohorts
- Macedonians: 12 Veteran Heavy Cavalry with spears
- Gauls: Two units of 24 Veteran Medium Cavalry with spears in four ranks
- Galatians: 24 Veteran Medium Cavalry with spears in four ranks
- Thracians: 24 Veteran Medium Cavalry with spears in four ranks
- Cappadocians: 24 Veteran Medium Cavalry with spears in four ranks
- Shepherd Slaves: two units of 24 Militia Grade Medium Cavalry with spears
- Cappadocians: two units of 10 Veteran Skirmish Infantry with javelins
- Cretans: two units of 10 Veteran Skirmish Infantry with bows
Caesareans: Gaius Julius Caesar - red
- Aetolians: Two units of 8 Veteran Light Cavalry with javelins
- VIII/IX Legions: ten Cohorts of 8 Elite Heavy Infantry with pila in two lines each of five Cohorts
- Balearics: two units of 10 Veteran Skirmish Infantry with slings
- XII Legion: eight Cohorts of 8 Veteran Heavy Infantry with pila in two lines each of four Cohorts
- XI Legion: eight Cohorts of 8 Veteran Heavy Infantry with pila in two lines each of four Cohorts
Right Wing Command (Sulla/Caesar)
- X Legion: eight Cohorts of 8 Elite Heavy Infantry with pila in two lines each of four Cohorts
- Antesignani: 18 Superior Elite Light Infantry with javelins
- Roman Veterans: 12 Elite Heavy Cavalry with spears
- Germans: 18 Elite Heavy Cavalry with spears
- Germans: 18 Superior Light Infantry with javelins
- Gauls: 18 Elite Heavy Cavalry with spears
- Greeks: 15 Veteran Skirmish Infantry with javelins
- Greeks: 10 Veteran Skirmish Infantry with bows
- Reserve Cohorts: Six Cohorts of eight Elite Heavy Infantry with pila
This is a difficult battle to represent, especially since very few will have the resources to set up all the legions that would be needed. Fortunately, Simon MacDowall made some eminently sensible suggestions to compress the orders of battle; see http://legio-wargames.com/#/pharsalus/4537662701
Simon has kindly given me permission to use his ideas as the basis for a Tactica II game.
Pompey's Legions
These performed very poorly, as indeed Pompey expected. I have tried to inject some variation to make the game more interesting than just a load of identikit legionaries. On the Republicans' right flank, the Evocati and Spanish have been combined into a single legion, paired with the Cilicians. These both count as veterans. The two newly-raised Syrian legions are easily the worst troops in the army, so I haven't even rated them as proper cohort-based legions, instead giving them the same numbers of troops but constituting both as three units of Militia Grade infantry deployed in three ranks. These fight as ordinary units; they have none of the Roman bonuses usually associated with the cohort and legion structure. The I and III Legions are unreliable, but not of such poor quality, so they are defined as a sort of half way house between the others. They do count as cohort legions, but are only Militia Grade. In order to balance out the points values against the Caesareans, none of Pompey's legions throw pila. Of course they did do so, but nowhere near as effectively as their oppponents, so assume that they are just abstracted out as being of negligible effect. Also, all of Pompey's troops are represented as deployed in three ranks, so I have conveniently rendered them down into nine cohorts each to keep the lines consistent. This also helps bring down the army's points value to the point at which it is comparable with the enemy.
The Republicans' Cavalry
Caesar's old lieutenant and now inveterate foe Labienus was in charge of this wing, which was a large but unruly force. I have made them into a mostly columned attack force, so that hits are spread as evenly as possible across the front.
Caesar's Legions
The combined VIII/IX legions are rated as elite, as is the famous Legio X. All are deployed in two lines. However, two cohorts have been taken from each of Legiones X, XI and XII to represent the (elite) cohorts held in reserve behind the right wing cavalry force.
Caesar's Right Wing
Simon has suggested a plausible deployment of a smaller force of high quality horse (Romans, Gauls and Germans), with light infantry support in the form of Germans and the much-debated Antesignani. The good thing about this is that it matches the Republican cavalry in frontage and will inflict a decent amount of damage before being routed; the reserve cohorts should then easily be able to finish the job.
The Table-Top
The battle is scaled for 25mm figures at 12' wide by 5' deep; as always, adjust to suit.
Army Morale Ratings
The Republicans break when they lose three legions, the Caesareans when they lose two.
Historical Constraints and other possibilities.
To replay, Pompey should hold back all of his infantry and charge with the cavalry. Caesar should advance with everything. Labienus' cavalry was defeated by the reserve legions, which then flanked the left of their infantry line. This combined with pressure against the centre and left Republican legions to break them, giving Caesar the victory. To play as a refight, the Republicans should probably attack with their strongest force, the veteran legions on their right, while holding back for as long as possible with everyone else. Caesar would probably hold Mark Antony's force and attack in the centre and on his right.
thanx for all the hard work
ReplyDelete