


.JPG)


.jpg)


.JPG)


The Antigonids
Right Wing: 2 units of 12 Xystophoroi, elite heavy lancers; 2 units of 24 Guard Infantry, elite heavy pikemen in 3 ranks; and a unit of 8 Psiloi skirmish javelinmen. David in command.
Centre: 1 unit of 36 Macedonian Phalangites, veteran heavy pikemen in 3 ranks; 3 units of 32 Asiatic Phalangites, veteran medium pikemen in 4 ranks; 1 unit of 18 Greek Mercenary Cavalry, medium horse in a 3-rank column; 1 unit of 8 Psiloi skirmish javelinmen; and 1 unit of 12 Slingers. Colin in command.
Left Wing: 1 unit of 16 Tarentine-style Light Cavalry in a 4-rank column; 2 units of 8 Skythian Horse Archers; 3 large units of 18 Light Infantry in 3-rank columns; and 1 unit of 12 skirmish archers. Me in command.
Seleukos
Left Wing: 2 units of 24 Argyraspides, elite heavy pikemen in 3 ranks; 1 unit of 12 Guard Cavalry, elite heavy lancers; and 1 unit of 12 skirmish archers.
Centre: 4 powerful Phalanxes each of 36 figures, veteran heavy pikemen in 3 ranks; 1 unit of 10 Psiloi skirmish javelinmen; and 1 unit of 12 skirmish archers.
Right: 1 unit of 8 Persian Light Cavalry; 1 large unit of 18 Line Heavy Cavalry; 2 units of 12 Peltasts; 1 unit of 12 Skythian Horse Archers; another unit of 8 Persian light horse; and a unit of 12 skirmish archers.
Gordon and Ian split the army between them, Gordon to their left and Ian to the right.
The nature of the terrain constrained the two armies and it was clear from the outset that this was going to be a grinding match between the two phalanxes, with the formidable Seleucid centre advancing against the larger, but less powerful Antigonids with the hill advantage. Unless, of course, someone managed a heavy cavalry breakthrough somewhere.


Antigonus responded by attacking, leaving the safety of the hill. The reason for this is that if a unit is caught at a slight angle, the resulting overlap favours the opposition, and the Seleucid phalanxes presented just this opportunity. In other words, Antigonus traded a defensive advantage for an offensive one. Also, and this was crucial, Antigonus realised that the Argyraspides would eventually overwhelm his cavalry at the river edge. There was also the the added threat of the large unit of Seleucid heavy cavalry flanking the Asiatic medium phalanxes. Better to get stuck in straight away and try to defeat the Seleucid centre and win the battle that way. A tough choice!

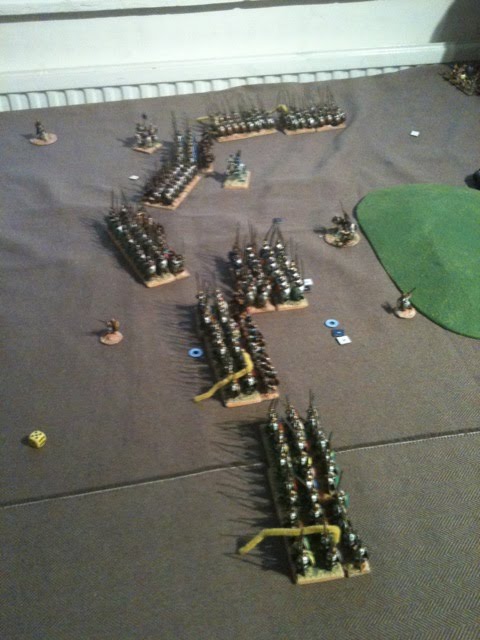
Photograph Number 3 shows the result of the clash along the line. The light troops have more or less cancelled out, Antigonid numbers being matched by the Seleucid defence of the rough ground. In the foreground of the photograph you can see the Seleucid heavy cavalry threatening to break through. Just in front of them, to the right off the shot, are lurking Skythian horsemen. These succeed in drawing off the heavies from flanking the line in the centre. Here the Seleucid phalanxes are in trouble. I use counters to mark hits, but Gordon uses pipe cleaners, which are already working along the rear ranks of the central Seleucid phalanxes. On the far side, one unit of Antigonus' Guard Infantry has already broken through, and the Seleucid Xystophoroi are in real trouble. Before the battle began, I said that my only wargaming superstition is that the first game for a newly painted unit sees them perform miracles, or run at the first sight of trouble. Unfortunately for Seleucus, the latter happened here. The elite horse have failed their morale, and are about to crumble in the face of the Guard infantry - I think the cavalry only lost one figure before running away! At the extreme end at the river edge, the Argyraspides are happily crunching through the heavy cavalry there.

The fourth photograph shows the desperate struggle in full. At the far end, all of the cavalry has disappeared, and the respective elite infantry units try to get into position to hit one another after breaking through. The left of the Seleucid phalanx has caved in completely, but their right is doing better against the Asiatic mediums. This is going to be very close indeed.
Finally, the end, with the remnants of the two sides. The Seleucids just win through against their medium opponents, and no more. The washers behind the units represent disorder and the pipe cleaners show that the Seleucid phalanx in the foreground has two hits left, and its friend has only one. Seleukos won by these three figures.
Another very close game, and it could have gone either way right to the final turn. The Macedonians have forcibly returned the rebellious Armenian region to the fold. Next up: the Carthaginians again attack the Romans in southern Italy.
Another excellent report, Paul. Nice to see a few photos there spicing it up, too. That's quite an impressive collection of Successor types if you are supplying both sides! Anyway, here's hoping your next debut unit makes up for the disappointing performance of the Xystophoroi...
ReplyDeleteCheers,
Aaron
Hi Aaron, thanks for looking. The next debut unit will probably be the Ligurians I painted up for Zama. Depending on what happens next week, the Romans may well be seeking to pacify northern Italy. For the sake of the campaign, I think I'd like them to win!
ReplyDeleteThe Successor figures are based on an old Pontic army I painted years ago for a friend who lost interest. After buying them back, I realised that it wouldn't take too much work to get two armies out of them. And a bit more work will give me enough for Magnesia as well.
A quick postscript. Gordon says that his angling of the Seleucid phalanxes was deliberately designed to tempt Antigonus off his hill. It worked. He also said he would never do it again!
ReplyDelete