We multiplied our usual Tuesday game to produce a bit of a monster to celebrate the holidays. Loosely based on historical events, 121 BC sees a large Gallic attack on Transalpine Gaul. The Allobroges have come south, apparently pressurised by movements elsewhere that are unknown to the Romans. They ally with the Arverni, who have long had their eyes on Roman wealth, and have been lulled into a feeling that Transapline Gaul is ripe for the picking because of the relative peace that has lasted for several generations now. Teutomallius of the Allobroges and Bituitus of the Arverni now lead their combined forces into Romanised lands.
Here they meet a full consular army of four legions led by Gnaeus Domitius Ahenobarbus, further reinforced with another two legions under the command of Quintus Fabius Maximus, with propraetorian
imperium. Also present are the usual contingents of auxiliary Numidians and Spanish, along with a few Cretan archers. The armies clash in lush farmland near the confluence of the River Sulga with the Rhone (off table). The area is mostly flat, with an abandoned estate, a large orchard and a hill being the only main features, along with a couple of smaller areas of rough ground.
I built the army lists for both sides. The idea was to put on a suitably grand multi-player holiday game for as many people as cared to turn up on the evening. I wasn't too bothered which side I played, although as it turned out we had enough for four per side, including me. I ended up running Maximus' command at the left of the Roman infantry line, along with the left wing cavalry command. Figures were provided by myself, Simon, Graham and Willy. The Gallic deployment, from the Roman perspective:
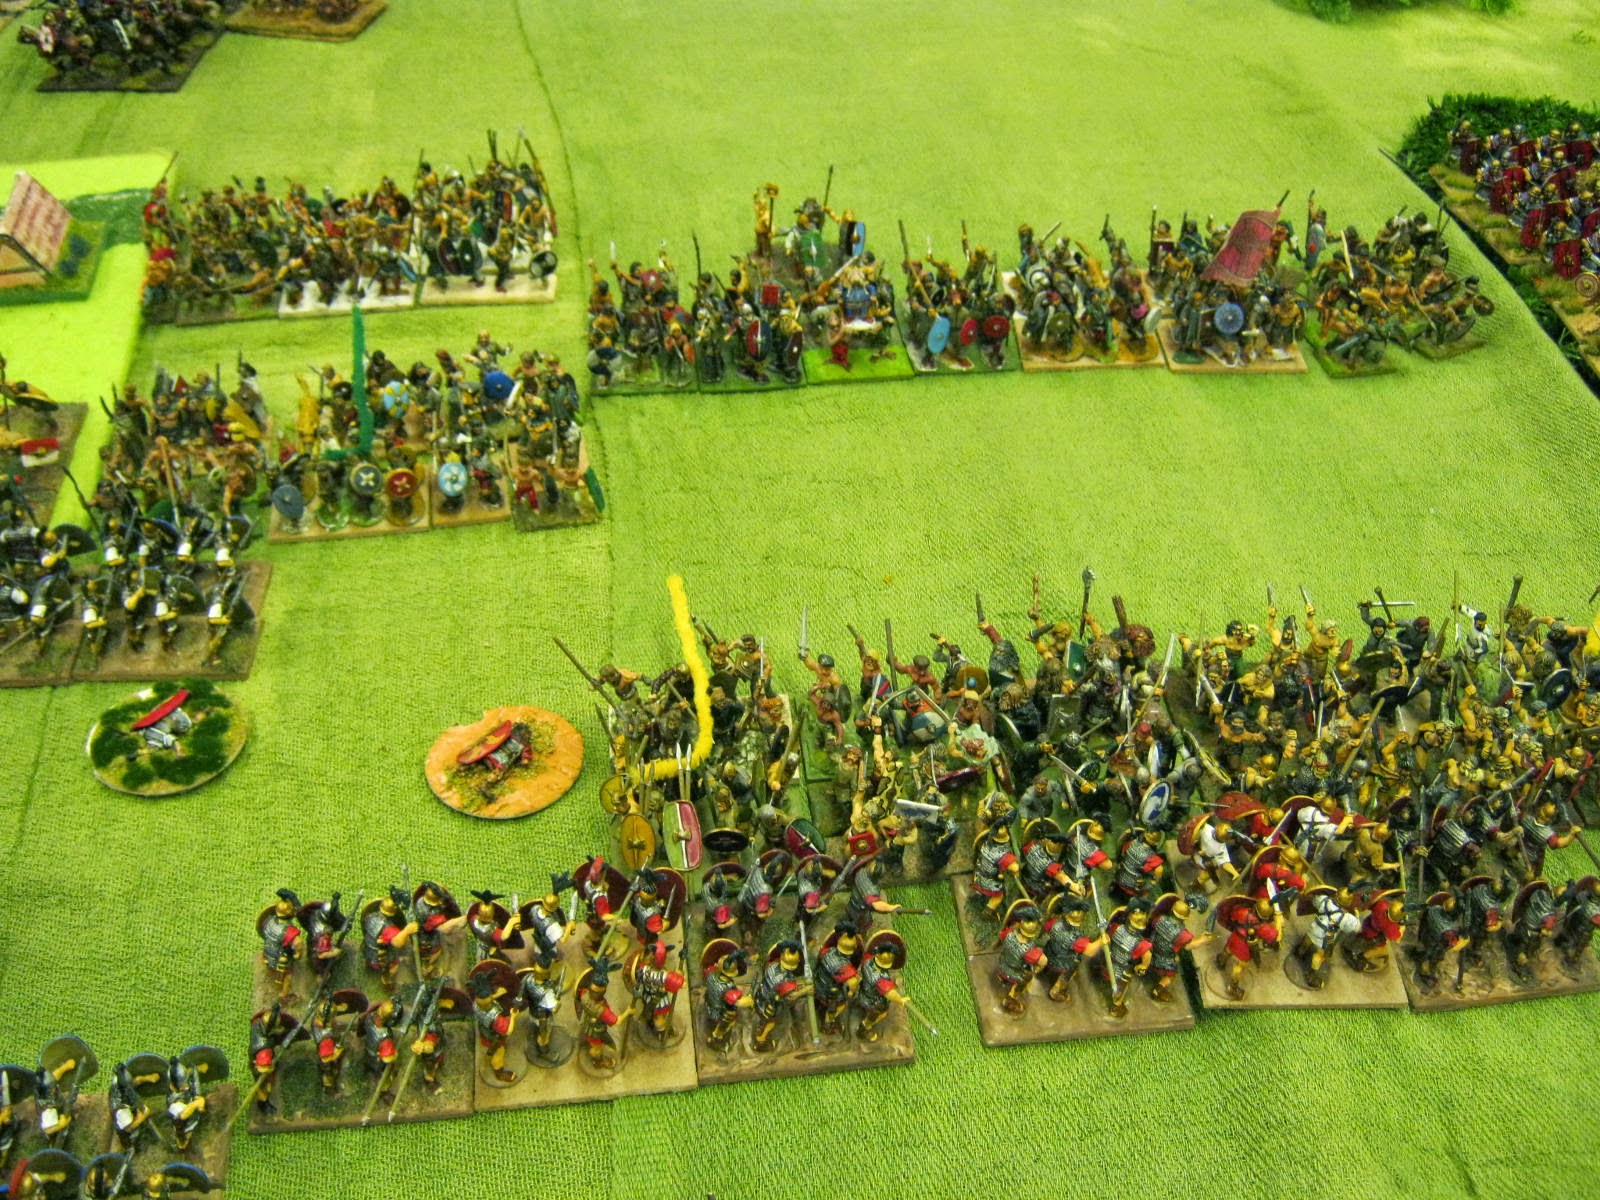
The Allobroges on the Gallic right wing, commanded by Graham. This meant he would be fighting against his own Roman figures, comprising my command opposite him. The Gauls here have a large cavalry force and many skirmishers and loose warband warriors poised to loot the estate.
Willy commands the main force of the Allobroges, ready to come straight through the gap between the estate and the orchard. At the top right of the photo are some of the Arverni, formed up across from the orchard itself.
Simon has the main Arvernian force in the mainly open area at the left of the Gallic infantry centre, including their king as well.
Their extreme left (Gordon): three cavalry units plus a loose formation warband in support.
Gallic commanders. From left to right as you look at it: Graham, Willy, Simon and Gordon. Such handsome tribesmen, ripe for service in the
latifundia after Rome wins. Of course.
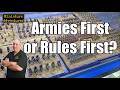
My left wing: Spanish cavalry fronted with Numidians and loads of nasty evil Balearic slingers. A Roman prefect tries to keep them under control.
The two Roman legions of the propraetorian command: Graham's figures, lined up against the Allobroges.
The two Latin legions of the consular army proper, led by Billy. He has two units of Caetrati attached to his command to watch the orchard. Gauls like trees.
Ahenobarbus (Bill Robertson) has his Roman legions at the right of the main infantry line, facing the Arverni.
An angled shot taken from the extreme Roman right. The combined Latin and Roman Equites are here, with Numidians and skirmishers out front - other Graham in command here.
Not a great photo of the Romans. From the left as you look at it: Graham, Bill, Billy and me. Blurry or airbrushed - take your pick! And, yes, that's right: this is a game with two Grahams and three Williams, helpfully called Bill, Billy and Willy.
We added some scenario-specific rules to flavour. Both Gallic tribes have to be broken separately - in effect, each is a single army. They both have the same composition: three units of eighteen medium horse; one warband of 36
soldurii led by the king in person; one loose formation warband of 36 figures; five warbands of 48 figures; 10 skirmish archers; 10 slingers; and three units of 9 skirmishers with javelins. That makes a grand total of 624 screaming loonies, 108 cavalry, and 94 skirmishers. Or, at the notional ratio of 1:60, 43,080 warriors and 6,480 cavalry. Each tribe has three commands plus the individual unit led by the King. Loose warbands can move quickly through close terrain and fight at full effect while in it, albeit without impetus. They can also, if desired, form up outside the normal infantry central deployment zone. The large warbands can be deployed in either four or six ranks; both tribes have chosen the first option.
The Romans have two overall commanders, with Ahenobarbus in charge of the consular army as the senior. There is no functional difference between Romans and Latin
socii, nor is there between Hastati and Principes. Each legion comprises 12 Velites; two units of 24 Hastati; and two units of 24 Principes. No Triarii this late on. There are six such legions in total, with two units of 18 Equites medium cavalry. There are also two units of 12 Numidian light horse; two units of 18 Spanish medium horse; two units of 18 Caetrati; two units of 9 Balearic slingers; and two units of 9 skirmish archers, one Numidian and one Cretan. The Roman foot have formed up in
duplex acies, which confers rear support advantages on the Hastati in the front line. This translates to six legions of 108 figures each, plus 36 Equites, 36 Spanish horse, 36 Caetrati, 24 Numidian lights, and 36 assorted skirmishers. Or: 42,480 legionaries; 2,160 Equites; 2,160 Spanish Cavalry; 1,440 Numidian cavalry; and 2,160 skirmish infantry. The Romans will of course claim to be vastly outnumbered.
The opening moves on my cavalry wing: some jockeying for position while the legions advance to the right of the photo.
Imposing infantry centres.
The view on our far right.
A full table shot from off to my left.
The battle is developing on my cavalry wing. The enemy advances into a hail of well placed missiles from the slingers, and I throw the Numidians as far forward as possible in case they get a chance to chuck some javelins as well.
The Gauls are being somewhat cagey at our centre left.
However, the Roman legions on our right are closing on the Arverni quite rapidly. It does look as though we have superior forces at this part of the battle.
Our Equites, though, are well outnumbered.
A second long shot of the whole field.
A gratuitous closer shot of my wing at this point. Those Balearics are vicious!
The Arverni crunch into the Roman legions. Simon versus Bill.
The Arvernians' loose warband has been forced to abandon its position in support of the cavalry to try to stem the red tide as it threatens the left flank of the Gallic infantry centre. It doesn't do them much good.
The cavalry clashes back on my wing. I throw my Spanish and Numidians into the weakened enemy units before their reserves can come forward to help - that's the unit at the centre top of the photo.
The Allobroges commit at our centre left. Graham's figures are going to see action soon.
Their Arvernian cousins, however, aren't doing so well. Their initial attack on the Romans has petered out, and to add insult to injury their king goes and gets himself killed.
The enemy reserves go in and there is a furious cavalry action at my left.
The Gauls here, however, have lost one unit already, and the Numidians prepare to advance again.
The second of the Gallic cavalry goes down, taking one of the Spanish units with it, but leaving the last of the Gallic cavalry outnumbered and at a severe disadvantage as the Numidians join in too.
I did send some Velites into the estate, where they destroyed large numbers of enemy skirmishers before perishing themselves. The loose warband at the top of the estate is still deciding whether or not it wants to join in, while its brothers in the open go charging forwards into the legionaries.
I pulled myself back a little for the shot above to show the foremost warbands hitting the Hastati, while the reserves of both sides wait to see what happens.
The Latin legions are still mostly unengaged.
The Roman legions are starting to break through, but then so are three enemy cavalry units, the Equites and Numidians having been wiped out to a man. The race is on - can the Romans swing round into the centre before the cavalry hits them?
Allobroges versus Hastati as my legionaries engage. The loose formation warband has moved into position to make an attack of its own from the estate.
A low-angled shot from my left, just for the sake of it.
At the far side of the field, the Roman legions have broken right through...
...with flanking Gallic horse in hot pursuit.
The allied Gallic tribes are starting to get desperate. They haven't yet made enough headway, so the loose warband in the estate joins in.
The Latins are now engaged as battle rages right across the field.
Romans with nothing to their front.
Gallic cavalry with Roman backs to their front.
A gap opens up for a short breather. My Hastati have gone, but they took plenty of the enemy with them.
The final charge of the foremost Allobroges as they go into my fresh Principes.
The Arvernians have even decided to contest the orchard against the Caetrati.
The final moments. Latin Principes go in to finish off the Arverni, while at the same time the Gallic horse ride down the Roman legionaries with great glee.
The Gauls fell before the onslaught of the Latin legions and the Roman propraetorian command at the left of the Roman army. However, the Gallic cavalry exacted a terrible price, riding down one Roman legion and 75% of the other. A Roman victory, then, albeit at a price. The Romans are left wondering why the Allobroges came south at all. Gallic prisoners are muttering something about flaxen-haired giants on the move. A final photo of our participants, courtesy of Thomas:
Next in the campaign will be a Ptolemaic civil war as the succession is disputed. The year is 116 BC.


.JPG)


.jpg)


.JPG)


That's a mammoth of a game!! Great report!
ReplyDeleteHi Ray, that was quick - you must have been on your virtual way!
DeleteMassive battle! That's the beauty of ancient warfare armies, the color, the solid ranks. Very impressive.
ReplyDeleteThanks, Joseph, we do like a table groaning with lead. Not our usual size of game, though!
DeleteMarvellous looking game. What rules, I didn't see you mention them?
ReplyDeleteFMB
Hi FMB, rules were the playtest version of Tactica II. Much improved over the original, they keep the flavour and basic mechanisms, but give much more flexible army and unit compositions, and command structures. I wrote the report to be rules neutral to avoid jargon.
DeleteGreat report of a magnificent game. More pictures to come. Paul doesn't explain that he had armed his Balearic slingers with sub-machine guns and that they were emptying 4 or 5 saddles a turn. As a result, from having a slight superiority I ended up at a significant disadvantage.
ReplyDeleteIt should be said that Paul had put a significant amount of work into planning this game, which was completed within 3 and a half hours playing time.
Hi Graham you're right, I hadn't thought about the time it took. You're also right about the Balearic machine gunners!
DeleteFantastic! That's a really impressive sight. How wide was that table?
ReplyDeleteHi John, table was 12 feet wide by 6 feet deep. I think we got the terrain about right - enough to give some local challenges, but not so much as to cramp the armies.
DeleteAn epic game Paul, looks great.
ReplyDeleteThanks, Cyrus and a Happy New Year to the Great King...
DeleteThat is a big looking game! Your opposition plays the Gauls like I do - inflict a lot of damage, but lose.
ReplyDeleteHi Shaun, I know what you mean! Having said that, if you really like adrenaline, you could dispense with the wave attacks and attack with the whole lot in deep columns. Very exciting. However, a break in the formation would then be lethal...
DeleteAnother Great report. I envy you guys getting to play so regularly. Its hard for us to get even two or three guys together. Spotted the casualty markers on the table. How did they work out? Have been finishing some more off myself. now if I could only get the guys together for a game of Tactica.
ReplyDeleteHi Mitch, the markers worked really well - I double-sided them to give numbers of 1-12 on one side and 13-24 on the other. A few had 25-36 for really large units. I only had enough for the Romans, though. I'm painting casualties for each army as I go, and I don't have Germans or Gauls. Yet. I am a real megalomaniac for figures, even more so than our other players, I think. We are fortunate to have a group meeting place and a regular time, and some of us have known each other for over thirty years now - and have been collecting armies at least that long...
DeleteWhat an impressive, very impressive battle! Great looking armies and game!
ReplyDeleteMerci, Phil - and a Happy New Year to our old allies in France!
DeleteLooking back at the pics, do I see Romans fighting on the side of the Gauls? Right behind that one woods...look like regulars with red Roman shields.
ReplyDeleteWell spotted! Those are my Gallic auxiliaries for Caesar's army, equipped with Roman gear. You probably can't tell, but they have plaid cloaks. I also have some Roman command stands to turn them into the V Legio Alaudae, which was raised in Gaul. They were pressed into service for this big game as Gauls with looted Roman equipment. In other words, we needed the extra figures!
Delete