Our ongoing campaign has now reached the point where one of the major conflicts between the peoples of Iberia and the encroaching assimilators of all joy has erupted, and for the first time I was able to field the army in its own right. Deployment map:
I don't have any photos of the battle itself, because I still don't have the lighting the way I want it, but here is a short series of Battle Chronicler maps. The first one (above) shows the field and the relative deployments. The Celtiberians, in blue at the top, have come out of their hills and encountered a Roman army in a relatively well watered area with some woods scattered around the place - probably the plantations of that most odious of species, the Roman Eques. The Celtiberians have formed up with the mass of their infantry in the open area, flanked by contingents of cavalry and those nasty Caetrati for which they are so justifiably famous. I chose and deployed the army, because I supplied it, but to be as umpirically fair (is that even a word?) I built the forces before rolling for terrain - hence the two loose formation warbands at both ends of the main line. I also supplied the Romans and built their force for the game, but I left it to others to deploy this lot. The guys in red are Romans, white are Socii Legions, and yellow denotes mercenary skirmishers. The Romans basically have a proconsular legion minus the Triarii. Simon set them up in alternating "cohorts" of Hastati and Principes, deployed in depth in the centre and with each end of the line held by troops in a more shallow formation, ably supported by the heavy cavalry.
After seeing the Roman set up, I thought they would hold back and let the Celtiberians come to them. The Romans have superiority in skirmishers, and hold the field - all they need to do is hold for a draw in campaign terms. However, they did that Roman aggression thing that got so many of them killed at Cannae:
However, the legionary line facing me came forward, allowing the Equites to go in at the oblique to help against the loose formation loons at this point.
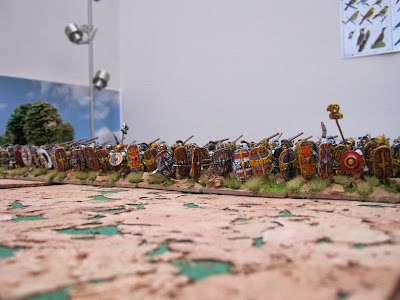
Just as it looked as though the legions would win through, the leftmost (shallow) unit of Latins collapsed - well, it was outnumbered - but unfortunately for the Italians there was a cascade failure and the whole left of their line ran for it. One of the Roman units disintegrated as well, but the rest of the boys in red didn't seem to mind too much. The warband hit by the Roman cavalry routed at the same time, as did one of the closer formation warbands, disordering some of their friends and my Caetrati, but it wasn't enough. And, just because I can, here's a picture I took of the Celtiberian victory when I managed to get some decent daylight:
Very little deters the juggernaut of Rome, however, and another army is already on its way...


.jpg)


.JPG)


Formidable looking bunch. Nice AAR. I like your chronicler maps. I'd love to know how you do that. Lighting looks good too.
ReplyDeleteHi Simon, Battle Chronicler is a free piece of software - I have a link to it on the left hand column on the blog as you look at it. It is a bit clunky at times, but, hey, it's free...
DeleteI have to admit that I cheated on the photo - I left the figures up and then took a shot during daylight. Well, the few hours of it we see at this time of the year!
Good effort with Celtiberians! Republican Romans are always pretty tough. Have a great Xmas!
ReplyDeleteHappy whatsits to you too, and to one and all. I was going to say happy Saturnalia, but the Romans lost! I presume the Iberians celebrated something similar - maybe a bit more mysterious, something involving the dark of the moon and oak trees. Although since it's Spain it was probably an olive grove...
DeleteGreat pictures and I must confess, I love it when the Romans lose! ;-)
ReplyDeleteHi Monty, so do I!
DeleteNice report. Hope to see more from the Celtiberians. Would love to see your T2 army list for these. Do Socii Legions differ in any way from Roman Legions?
ReplyDeleteThanks for looking, Mitch. I just used the list I came up with on the army lists page - I haven't yet converted it to Tactica II format. To be honest, I just based it on what I thought felt right for 2,000 points, and for the figures available. It worked on the Romans, though!
ReplyDeleteThere's no discernible difference between the Socii and the Romans in this period, I think (roughly 170 BC) - we just use guys with white shields for the former and red for Rome to help differentiate the commands. Anyway, it looks pretty...